
Starting your calligraphy journey begins with selecting a tool that responds predictably to your hand movements. For most beginners, the ideal starting point is a medium-sized mixed-hair calligraphy brush, often referred to as a combination brush. This type of brush blends stiff and soft fibers to offer a balanced level of springiness and ink retention, allowing you to learn basic stroke structures without fighting a tool that is either too floppy or too rigid.
Choosing the right brush prevents the frustration of poor ink flow and uncontrollable tips, which can easily discourage a novice. By focusing on versatile, mid-sized options, you can practice a wide variety of script styles on standard grid paper before investing in specialized or premium equipment.
Understanding Calligraphy Brush Anatomy and Materials
To make an informed purchase, you must first understand how a calligraphy brush is constructed and how its physical components affect your writing experience. The brush consists of three primary parts: the handle, the ferrule or binding area, and the brush head. Each part plays a critical role in how the tool balances in your hand and how ink is delivered to your paper.
Products mentioned in this guide
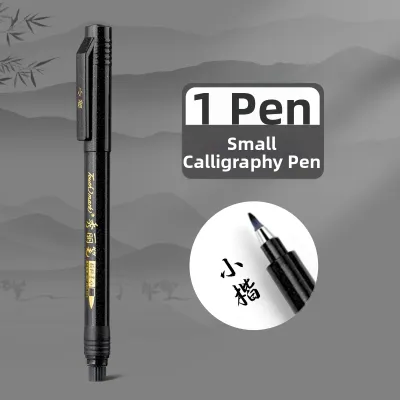
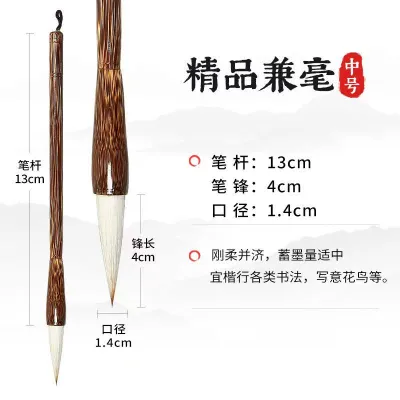
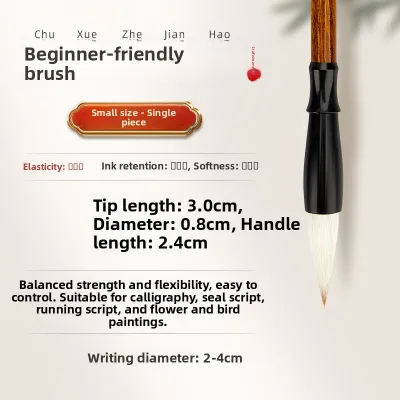
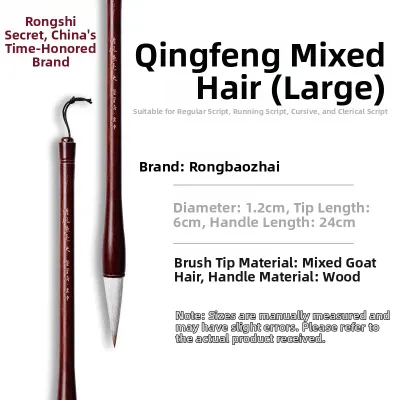
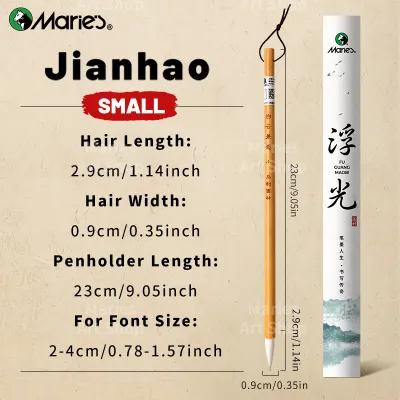
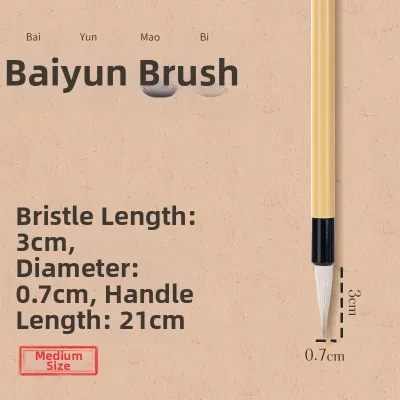
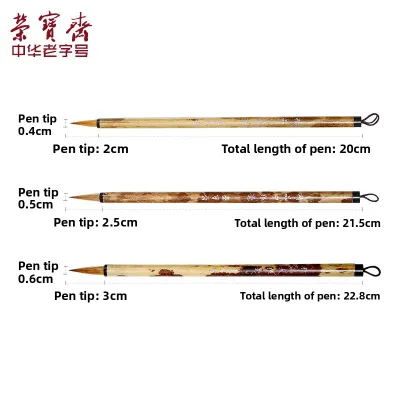
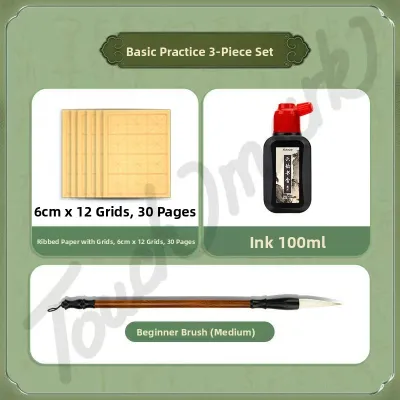
Prices are valid at publication and may change. Please refer to the product page for the latest price.
The handle, traditionally crafted from bamboo or wood, dictates the overall weight and balance of the brush. Lightweight bamboo handles are highly favored for beginners because they minimize hand fatigue during long, repetitive practice sessions. Heavier materials, such as ceramic, stone, or dense acrylic, might look appealing but can strain your wrist and fingers before you have developed the muscle memory required for consistent stroke control. When holding a brush, the weight should feel evenly distributed, with a slight bias toward the tip to help guide your downward pressure naturally.
Where the hair meets the handle is the ferrule or binding section. In traditional calligraphy brushes, the hair is bundled, tied with thread, and glued securely inside the hollowed end of the wooden or bamboo shaft. High-quality construction ensures that the adhesive used is water-resistant and that the hair bundle is packed tightly. Poorly constructed brushes often shed hairs during use, which ruins your strokes and leaves debris on your paper. Checking that the hair is firmly anchored and that there are no loose fibers protruding from the collar is an essential quality check.
The brush head itself is composed of either natural animal hair, synthetic fibers, or a blend of both. The physical structure of the hair determines how much ink the brush can hold and how easily it returns to its original shape after a stroke. Natural hairs possess microscopic scales that naturally trap and hold liquid ink, providing a smooth, continuous flow. Synthetic fibers, while smoother and less absorbent, offer excellent durability, consistent springiness, and are much easier to clean, making them highly practical for modern practice inks.
Recommended Brush Hair Types for Beginners
When browsing calligraphy brushes, you will encounter three main categories of hair: stiff, soft, and mixed. For a beginner, navigating these options can be daunting, but understanding their functional differences makes the choice straightforward.

Mixed hair brushes are highly recommended for beginners because they offer a hybrid performance profile. These brushes typically feature a core of stiff hair (such as weasel or rabbit) surrounded by an outer layer of soft hair (such as goat). The stiff inner core provides the spring or resilience needed for the brush to snap back to a point after a stroke, while the soft outer layer holds a generous amount of ink and allows for smooth, sweeping lines. This combination makes mixed hair brushes incredibly forgiving, helping you maintain control over your line widths as you learn to regulate hand pressure.
Synthetic brushes have also become an excellent option for modern beginners. Advanced synthetic fibers are engineered to mimic the tapering of natural hair while offering superior structural resilience. They do not degrade as quickly when exposed to acidic or heavy pigment inks, and they are highly resistant to shedding. If you prefer a tool that requires minimal maintenance and offers highly predictable behavior every time you pick it up, a high-quality synthetic brush is a reliable and cost-effective choice.
Pure hair brushes, such as pure goat hair or pure weasel hair, are generally better suited for intermediate to advanced practitioners. Pure goat hair is exceptionally soft and holds a massive volume of ink, but it lacks spring. Writing with a soft brush requires precise wrist control and pressure regulation; otherwise, the brush head will collapse into a shapeless puddle on the paper. Conversely, pure weasel hair is very stiff and responsive, which is excellent for sharp, energetic scripts, but it holds less ink and can feel unforgivingly rigid to a novice. Transitioning to these pure hair types is best done after you have mastered basic stroke execution with a mixed or synthetic brush.
Sizing and Shape: Choosing the Right Dimensions
Selecting the correct brush size is just as important as choosing the right hair type. Calligraphy brushes come in a vast range of lengths and diameters, but beginners should focus on dimensions that match standard practice materials.
For daily practice, most beginners use grid paper with squares measuring between 2 inches and 3 inches (approximately 5 to 7.5 centimeters). To write characters that fit comfortably within these grids, a medium-sized brush is ideal. Look for a brush with a tip length (often called the out-of-hair length) of about 3 to 4 centimeters, and a belly diameter (the widest part of the hair bundle near the handle) of approximately 0.8 to 1.0 centimeter. This size provides enough ink capacity to write several characters without refilling, while still allowing you to execute fine details and broad strokes within the grid boundaries.
The shape of the brush head should resemble a standard, well-tapered cone. When wet, the brush should naturally form a sharp, fine point at the tip, while maintaining a plump, rounded belly in the middle. This classic shape allows you to transition seamlessly from thin hairline strokes to thick, heavy strokes by pressing down into the belly. Avoid specialized shapes, such as ultra-long leaf brushes or flat-tipped brushes, until you have a specific stylistic need for them, as they require non-standard techniques to control.
Before purchasing, always check the manufacturer’s specifications for the brush’s physical dimensions rather than relying solely on generic size labels like medium or large, which can vary significantly between brands. Measuring or verifying the out-of-hair length and belly diameter ensures you get a tool that matches your practice paper and prevents you from accidentally buying a miniature detail brush or an oversized display brush.
How to Evaluate and Select Your First Brushes
Whether you are shopping at a local specialty stationery store or browsing an online marketplace, knowing how to evaluate a brush’s quality will save you from wasting money on defective tools. You can perform several simple, observable checks to assess a brush’s construction.
First, inspect the tip of the brush while it is dry. A well-made brush should have a clean, unified point where all the hairs taper together smoothly. If you notice individual hairs splaying outward, splitting into multiple points, or showing uneven lengths at the tip, the brush is poorly constructed and will make drawing clean lines difficult. While some brushes are shipped with a water-soluble starch coating to protect the shape, you can still observe if the overall silhouette is symmetrical and free of stray, bent fibers.
Next, examine the belly of the brush. Gently squeeze the hair bundle between your fingers to check for density and even distribution. The belly should feel full and springy, without any hollow spots or soft pockets near the ferrule. A hollow belly cannot hold ink evenly, leading to sudden pooling or dry patches mid-stroke. The hair should feel consistently packed all the way around the circumference of the handle.
Finally, verify the manufacturer’s labels or product descriptions for ink compatibility. Traditional calligraphy brushes are designed for water-based inks, such as liquid sumi ink or ink ground from traditional inkstones. Avoid using heavy acrylic inks, shellac-based drawing inks, or solvent-based pigments with natural hair brushes, as these substances can permanently clog the fibers, strip the natural oils from animal hair, and ruin the brush’s ability to hold a point. Ensuring your brush is rated for water-based practice inks is key to preserving its performance.
Building a Value-for-Money Starter Kit
As a beginner, you do not need an extensive collection of brushes to start practicing effectively. In fact, keeping your toolkit simple allows you to focus on mastering your technique without getting distracted by changing tools. A highly functional, budget-friendly starter kit requires only a few essential items.
Your primary investment should be a single, high-quality medium mixed-hair brush. This will be your workhorse tool for daily character practice. To complement this, you can add one small synthetic detail brush. The small brush is excellent for writing smaller characters, signing your work, or practicing fine-line scripts. This two-brush setup covers almost all beginner practice scenarios and keeps your initial costs low, typically ranging from S$15 to S$30 in total.
You should actively avoid purchasing unnecessary accessories or advanced tools during your initial learning phase. Oversized display brushes, which are designed for large-scale performance calligraphy, are difficult to control and require massive amounts of ink and paper. Rare animal hair variants, such as pure sable or specialized goat hair, carry premium price tags without offering any practical advantage to a beginner. Similarly, elaborate brush rests, heavy stone inkwells, and decorative hanging racks are aesthetic additions that you can easily skip or replace with simple household items, like a ceramic chopstick rest or a small saucer.
When sourcing your starter kit, look for reputable local stationery shops that specialize in art supplies, or search established online marketplaces. If buying online, prioritize listings with high seller ratings and detailed customer feedback that specifically mentions the brush’s durability and shedding behavior. Many reliable brands offer curated beginner sets that bundle a suitable brush with practice paper and water-based ink, providing an easy, cost-effective entry point.
Basic Care and Storage to Protect Your Investment
Proper maintenance is essential to keep your calligraphy brushes in optimal writing condition. Because Singapore’s tropical climate features high humidity year-round, taking care of your brushes also protects them from mold, mildew, and pest damage.
After every practice session, rinse your brush thoroughly under cool, running water. Gently massage the hair bundle from the ferrule down to the tip to release trapped ink. It is vital to clear all ink residue from the base of the ferrule; if ink dries inside the collar, it hardens, expands, and causes the hairs to split and break over time. Never use hot water, dish soap, or harsh chemical solvents, as these will strip the natural oils from animal hair and dissolve the adhesive holding the bundle together.
Once the brush is clean, gently reshape the tip into a sharp point using your fingers. To dry the brush, hang it vertically with the tip pointing downward. Most traditional brushes have a small loop of string at the end of the handle for this purpose. Hanging the brush allows gravity to pull moisture away from the ferrule, preventing water from pooling inside the handle where it can rot the wood or degrade the glue. Never dry your brush flat on a towel or upright in a cup, as water will seep back into the handle and loosen the hair bundle.
Store your dry brushes in a well-ventilated area away from direct sunlight. In humid environments, storing damp brushes in airtight plastic containers or closed drawers can quickly lead to mold growth. If you use a bamboo roll-up brush wrap for transport, open it up as soon as you return home to let the brushes air out completely. Keeping your storage area dry and well-ventilated will ensure your brushes remain clean, springy, and ready for your next practice session.
Frequently Asked Questions (FAQ)
Do I need expensive animal hair brushes to start learning?
No, expensive animal hair brushes are not necessary for beginners and can actually hinder your early progress. Premium pure hair brushes require advanced control and meticulous maintenance that can be overwhelming when you are just learning basic strokes. Mixed-hair or high-quality synthetic brushes are much more affordable, highly durable, and offer the predictable springiness needed to build confidence and muscle memory.
How can I test if a brush holds enough ink before buying?
When physical wet-testing is not possible, you can estimate ink capacity by checking the brush’s physical specifications and visual density. Look for a brush with a plump belly diameter of at least 0.8 centimeters, as a thicker belly indicates a larger reservoir for holding ink. Additionally, inspect the hair density near the ferrule; a tightly packed, thick bundle of hair will naturally retain more liquid than a thin, sparse brush.
Should I start with a traditional brush or a brush pen?
If your goal is to master traditional calligraphy techniques, starting with a traditional brush is highly recommended because it provides authentic tactile feedback and teaches you how to manage ink flow. However, if you prioritize portability, quick setup, and mess-free practice, a refillable brush pen with a flexible synthetic tip is an excellent modern alternative for casual daily practice.

Community discussion
Share your experience or ask a question. Comments are reviewed before publication.