
Cross stitching is a relaxing, screen-free hobby that allows you to create beautiful, textured art with just a needle and thread. For beginners in Singapore looking to explore this classic needlework craft, selecting a first cross stitch set is the most critical step. With countless designs available online and in local craft shops, it is easy to be drawn to a complex, beautiful image on a box, only to open it and find a confusing tangle of unlabelled threads and vague instructions.
To ensure your first experience is rewarding rather than frustrating, you must know how to identify a high-quality starter kit. A complete beginner should prioritize a cross stitch set that features 14-count Aida fabric, pre-sorted cotton embroidery floss, blunt-tipped tapestry needles, and a clear pattern chart with a comprehensive color legend. Selecting a kit with these user-friendly components will help you master the basic techniques of tension, counting, and stitching without unnecessary obstacles.
Essential Components to Check in a Beginner Cross Stitch Set
Before purchasing a starter kit, check the product description or packaging to verify that it contains the fundamental tools required for a smooth learning experience.
Products mentioned in this guide
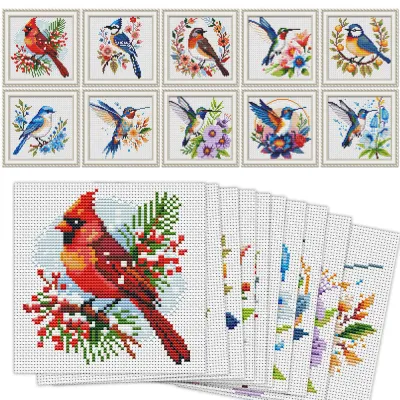
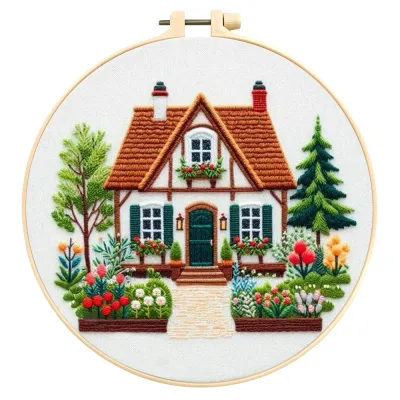
Prices are valid at publication and may change. Please refer to the product page for the latest price.
Aida Fabric The foundation of almost all beginner kits is Aida cloth. This specialized cotton fabric features a distinct, open-weave grid pattern that creates natural squares. Each corner of these squares has a pre-formed hole, making it easy to see exactly where to insert your needle. For your first project, look for a kit that utilizes 14-count or 11-count Aida fabric. The ‘count’ refers to the number of squares per linear inch. A 14-count fabric is the industry standard for beginners because it offers a great balance of detail and visibility. An 11-count fabric features slightly larger squares, which can be helpful if you prefer a highly visible grid or want to reduce eye strain.
Embroidery Floss The thread used in cross stitch is known as embroidery floss, which consists of six individual strands twisted together. A high-quality beginner kit must include pre-sorted floss. This means the threads are already organized on a cardboard organizer and labeled with their corresponding color numbers or pattern symbols. Avoid kits where the thread is bundled into a single, tangled mass that requires you to guess the shades. Additionally, ensure the kit provides 100% cotton floss, which glides smoothly through the fabric. The kit should also explicitly state that it includes generous yardage—typically 20% to 30% more thread than required—to account for mistakes and the natural learning curve.
Tapestry Needles Unlike standard sewing needles, cross stitch requires a tapestry needle. Tapestry needles feature a blunt tip and a significantly larger eye to accommodate multiple strands of embroidery floss. The blunt tip is essential because it allows the needle to slide effortlessly through the pre-existing holes in the Aida fabric without piercing or splitting the woven threads. For 14-count Aida, a size 24 tapestry needle is the ideal standard, while size 22 is commonly paired with 11-count fabric. A quality kit should include at least two needles, as these small tools are easily misplaced.
Pattern and Instructions The pattern chart is your roadmap for the entire project. In a beginner-friendly kit, this chart should be printed in a clear, high-resolution format, using distinct, high-contrast symbols for each color. The pattern must be accompanied by a comprehensive color legend that links each symbol to its specific thread color code (ideally using standard systems like DMC). Look for instructions that include basic, step-by-step diagrams showing how to form a standard cross stitch, how to read the grid, and how to start and secure your threads without messy knots.
Embroidery Hoop or Frame While some minimalist kits omit the hoop to lower the price, having a sturdy hoop is highly recommended for beginners. A hoop—usually made of wood, bamboo, or molded plastic—consists of two concentric rings that clamp the fabric tightly between them. Keeping the fabric taut like a drum is crucial for maintaining consistent stitch tension. If your fabric is too loose, your stitches may end up uneven, puckered, or distorted. A plastic hoop with a secure metal adjustment screw or a smooth, splinter-free wooden hoop is an invaluable addition to any starter set.
Design and Material Features to Prioritize
Evaluating the design complexity and material quality of a cross stitch set before buying will save you hours of frustration and ensure you actually finish your first project.

Design Complexity When browsing for your first kit, it is easy to fall in love with large, intricate landscapes or highly detailed portraits. However, these complex designs are the quickest path to beginner burnout. For your very first project, prioritize small to medium designs, ideally measuring no more than 5 by 5 inches (approximately 12 by 12 centimeters). Choose patterns that feature a limited color palette of under 15 distinct colors. This keeps thread management simple. Furthermore, ensure the design relies entirely on whole cross stitches. Avoid patterns that incorporate fractional stitches (such as quarter or three-quarter stitches), heavy backstitching (fine outline stitches), or specialty stitches like French knots, which require advanced hand-eye coordination.
Fabric Quality The quality of the Aida cloth in your kit directly impacts your comfort while stitching. High-quality Aida is treated with a temporary starching agent that gives it a crisp, stiff texture. This stiffness is highly beneficial because it allows you to hold the fabric easily, even without a hoop, and prevents the edges from fraying rapidly. However, the fabric should not be so rigid that it feels like cardboard or cracks when folded. Inspect the weave of the fabric; the holes should be clean, perfectly square, and free of loose fibers or irregularities. Cheaper, unbranded kits often use poorly woven fabric with uneven holes, making it difficult to maintain neat, uniform stitches.
Thread Quality The thread is the most visible element of your finished piece, making thread quality paramount. High-quality kits feature mercerized cotton floss, which has undergone a treatment to increase its strength, luster, and colorfastness. Colorfastness is critical; if you need to wash your finished piece to remove hand oils or water-soluble pattern lines, cheap threads may bleed, causing dark dyes to ruin the surrounding fabric. When handling the floss, it should feel smooth and separate easily into individual strands without fraying or twisting into knots. Avoid unbranded kits that use highly synthetic, overly shiny polyester threads, as these tend to create static electricity, tangle constantly, and wear down as they pass through the fabric.
Instruction Clarity A well-designed kit leaves no room for guesswork. Excellent starter sets include clear, step-by-step written instructions accompanied by detailed illustrations or photos. The guide should clearly indicate the starting point of the pattern—which is almost always the exact center of the design—and explain how to locate the center of your fabric to ensure the design is perfectly aligned. It should also specify how many strands of floss to use for both the main stitching and any backstitching. Look for kits that provide a conversion chart to standard thread brands, which allows you to easily purchase replacement threads if you run out or wish to recreate the design in the future.
Red Flags: What to Avoid in Your First Kit
To prevent abandoning your project halfway through, learn to spot the warning signs of poorly designed, incomplete, or overly advanced sets.
Overly Complex Designs One of the most common mistakes beginners make is purchasing a ‘full-coverage’ kit as their first project. Full-coverage designs require every single square of the fabric to be stitched, leaving no background fabric exposed. These projects often feature ‘confetti stitches’—a term used to describe single, isolated stitches of a specific color scattered across the pattern—and ‘blended threads,’ where you must combine one strand of one color with one strand of another. While beautiful, these techniques require meticulous organization and extreme patience, often taking hundreds of hours to complete. For a first-time stitcher, a ‘partial-coverage’ design, where the main motif sits cleanly against an unstitched background, is far more manageable and rewarding.
Missing or Poorly Translated Instructions Many low-cost kits imported from unverified online sellers feature poorly translated, generic instructions that are virtually useless to a beginner. Red flags include pattern charts with highly similar or overlapping symbols (such as using a dark grey square and a black square right next to each other), missing color keys, or instructions that fail to explain basic stitching techniques. If a kit’s packaging lacks clear branding or has visible spelling errors, there is a high probability that the internal instructions will be equally frustrating to decipher.
Incorrect Tools Some cheap kits attempt to cut corners by including substandard tools that can actively damage your materials. Watch out for kits that include sharp embroidery or sewing needles instead of blunt tapestry needles; sharp needles will repeatedly pierce the fabric threads, causing fraying and misaligned stitches. Other common tool issues include flimsy plastic hoops that fail to hold fabric tension, or fabric pieces that are cut far too close to the design margins. A proper kit should provide at least 2 to 3 inches (5 to 7 centimeters) of extra fabric on all sides of the design to allow for hooping and future framing.
‘Stamped’ vs. ‘Counted’ Confusion Beginners often get confused by the distinction between ‘stamped’ (or printed) and ‘counted’ cross stitch. Stamped cross stitch features the pattern printed directly onto the Aida fabric, allowing you to stitch directly over the colored squares. Counted cross stitch utilizes blank fabric, requiring you to look at a printed chart and count the squares to place your stitches. While stamped kits can seem easier because they eliminate counting, they come with significant drawbacks. The printed ink on cheap stamped kits is often misaligned with the actual weave of the fabric, forcing you to make crooked stitches. Furthermore, if the ink is not high-quality water-soluble dye, it may fail to wash out completely after stitching, leaving permanent, unsightly marks on your finished piece. Counted cross stitch, though requiring slightly more initial concentration, teaches proper grid-reading skills and yields a cleaner, more professional result.
Recommended Types of Starter Sets for Newcomers
Choosing the right format of starter kit depends on your patience level, learning style, and how much time you want to commit to your first project.
Small Motif and Greeting Card Kits
For those who want a quick, satisfying introduction to the craft, small motif and greeting card kits are an exceptional choice. These sets typically feature tiny, charming designs—such as a simple flower, a geometric pattern, or a small animal—that can be completed in a single afternoon or over a weekend. Because the time commitment is low, these kits offer a rapid ‘quick win’ that builds immediate confidence. They are perfect for learning the physical mechanics of the craft, such as how to hold the needle, how to pull the thread to the correct tension, and how to transition between adjacent squares without creating a chaotic web of threads on the back of the fabric. Once finished, the completed piece can be easily mounted into an included card frame, making it a wonderful, personalized gift.
Bookmark and Practical Item Kits
If you prefer to create something functional rather than a piece of wall art, bookmark and practical item kits are highly rewarding. These sets usually feature narrow strips of Aida fabric with finished, non-fraying edges, designed to be stitched with repeating geometric patterns or elegant vertical designs. Working on a bookmark is highly satisfying because the narrow fabric is incredibly easy to handle, even without a hoop. The structured, linear nature of these designs helps beginners practice maintaining straight borders and consistent stitch sizes. Other practical kits include small coin purses, keychains, or coasters, which provide a clear, functional purpose for your finished handiwork and often require minimal assembly or sewing skills to complete.
Comprehensive 'Learn to Cross Stitch' Educational Kits
For individuals who prefer a structured, educational approach to learning new crafts, comprehensive ‘Learn to Cross Stitch’ kits are the gold standard. Instead of focusing on a single decorative design, these kits are specifically structured as educational samplers. They often include practice fabric, multiple colors of high-quality floss, and a detailed booklet or video tutorial link that guides you through a series of progressive exercises. You will start by learning the basic cross stitch, then progress to half stitches, backstitching, and eventually simple French knots. These kits are designed to build a solid foundation of technical skills, teaching you how to read complex charts, manage your threads efficiently, and troubleshoot common mistakes.
| Project Type | Estimated Time Commitment | Primary Skill Focus | Best Suited For |
|---|---|---|---|
| Small Motif / Greeting Card | 2 to 5 hours | Tension control, starting/ending threads | Absolute beginners seeking quick success |
| Bookmark / Practical Item | 5 to 10 hours | Border alignment, neat backstitching | Functional creators, gift-givers |
| Educational Sampler | 10 to 20 hours | Multiple stitch types, chart reading | Structured learners, long-term hobbyists |
How to Inspect and Organize Your Kit Before Stitching
Taking a few systematic steps to prepare your materials before making your first stitch will prevent mistakes and make your stitching sessions far more enjoyable.
Inventory Check Before you make your very first stitch, take a few minutes to perform a thorough inventory check. Lay out all the components of your cross stitch set on a clean, flat surface. Cross-reference the included embroidery floss colors and quantities with the pattern’s color legend. Ensure that every symbol on the chart has a corresponding thread color and that you have received the correct number of skeins or pre-sorted strands. Verifying this upfront prevents the frustration of realizing you are missing a crucial color halfway through your project, allowing you to contact the manufacturer or source a replacement before you begin.
Thread Organization Keeping your embroidery floss organized is the key to a stress-free stitching experience. If your kit does not come with pre-sorted threads, take the time to organize them yourself. You can use simple cardboard bobbins, plastic thread drops, or even small, labeled resealable plastic bags. Write the pattern symbol and the corresponding color code clearly on each bobbin or bag. When you need to pull a single strand of floss, gently slide it out from the bundle rather than pulling the entire thread, which can cause knots and tangles. Keeping your workspace tidy and your threads labeled will save you hours of untangling later on.
Fabric Preparation Preparing your Aida fabric correctly ensures a smooth stitching process. To find the exact center of your fabric, fold it in half horizontally, crease the fold gently with your fingers, and then fold it in half vertically, creasing it again. The point where the two creases intersect is the exact center of your fabric, which corresponds to the center starting point marked on your pattern chart. You can mark this center point with a tiny dot using a water-soluble fabric pen or by inserting a straight pin. It is highly recommended to avoid pre-washing standard beginner kits unless the manufacturer’s instructions specifically advise it. Washing the fabric prematurely can wash out the starching agent that gives Aida its helpful stiffness, making it limp and much harder to stitch.
Workspace Setup Cross stitch is a detailed, close-up craft that requires excellent lighting and proper ergonomics to prevent physical strain. Set up your workspace in an area with abundant, direct lighting. A bright window providing natural daylight is ideal, but a dedicated daylight lamp or an adjustable desk lamp positioned directly over your hands works perfectly for evening stitching. Ensure your seating is comfortable and supports your back. Maintain a relaxed posture, keeping your shoulders down and taking regular breaks to stretch your neck, hands, and eyes. This simple setup will prevent eye strain and fatigue, allowing you to enjoy your new hobby for hours on end.
Frequently Asked Questions (FAQ)
Do I need to buy extra tools if my cross stitch set doesn't include them?
While a comprehensive cross stitch set should theoretically contain everything you need, there are a few inexpensive, separate tools that will significantly improve your experience. A pair of small, sharp embroidery scissors is highly recommended; standard household scissors are often too bulky and dull to make the clean, close cuts required for thread management. A water-soluble fabric marking pen is another excellent, low-cost upgrade, allowing you to grid your fabric or mark your starting point safely. Finally, a simple needle threader can save you immense time and frustration, especially when working with multiple strands of floss or smaller needle eyes.
Is 14-count or 11-count Aida fabric better for absolute beginners?
Both options are excellent for beginners, but they cater to slightly different needs. 11-count Aida fabric features larger squares (11 holes per inch), making it incredibly easy to see the grid and insert the needle. It is highly recommended for children, individuals with visual difficulties, or anyone who wants a faster, more relaxed stitching experience. However, 14-count Aida fabric (14 holes per inch) is the industry standard. It provides a slightly finer, more detailed finished look while remaining highly manageable for beginners. If you have standard vision and want your finished piece to look crisp and detailed, 14-count is generally the best starting point.
What should I do if my kit is missing a specific floss color?
If you discover that your kit is missing a specific thread color, do not attempt to guess the shade by matching it to a random thread in your sewing basket, as even a slight color mismatch will stand out prominently in the finished design. Instead, refer to the kit’s pattern legend to see if it lists a standard industry color code, such as a DMC number. Most high-quality kits use these standard codes. You can easily purchase a replacement skein of that exact DMC color for a very low cost (usually under S$2.00) at a local craft store or through online marketplaces. If the kit does not use standard codes, contact the manufacturer’s customer service department, as reputable brands will happily send you the missing threads free of charge.
Community discussion
Share your experience or ask a question. Comments are reviewed before publication.