
The ideal crochet marker depends entirely on where you need to place it—directly into the yarn loops of your fabric or slipped over your crochet hook. Choosing the wrong style can lead to dropped stitches, interrupted rhythms, or damaged yarn fibers.
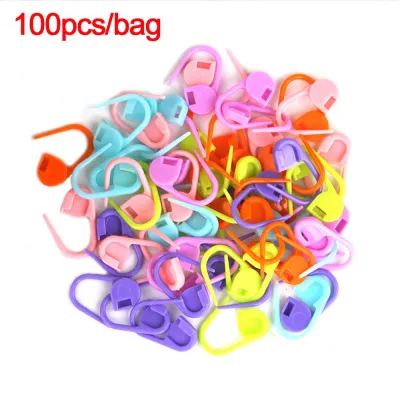
Locking crochet markers, which resemble miniature safety pins or split rings, attach directly to the yarn loops. This design makes them indispensable for marking specific stitches in amigurumi, lace, or garment shaping where the marker must move along with the physical fabric.
Ring-style crochet markers are solid, unbroken loops. They slide directly onto the shaft of the crochet hook rather than anchoring into the yarn. This makes them highly efficient for tracking continuous rounds, repeating stitch patterns, or counting intervals in long foundation chains.
Products mentioned in this guide
Prices are valid at publication and may change. Please refer to the product page for the latest price.
To make a confident purchasing decision, you must evaluate how these two designs interact with your yarn, your tools, and your physical crafting habits. This guide breaks down their mechanical differences, security profiles, and project-specific performance to help you choose the best tool for your craft space.
Understanding the Core Design Differences
To understand why these two tools perform so differently, you must look at their physical construction and how they interface with your crochet projects. While both are broadly sold under the umbrella term of “stitch markers,” they are designed for entirely different mechanical workflows.
Locking crochet markers feature an opening and closing mechanism. The most common designs are plastic safety-pin styles, split-ring designs, and metal lobster-claw or bulb-pin clasps. Because they can open and close, you can insert them into any active or completed stitch at any point in your project. You can hook them into the top loops of a stitch, around the post of a stitch rows below, or into a specific chain space. Once closed, they form a secure, closed loop around the yarn, preventing them from falling out until you manually unlock them.
Ring-style crochet markers are solid, continuous loops with no opening mechanism. They are typically made of polished plastic, metal, silicone, or wood, and are sometimes adorned with decorative hanging charms or beads. Because they cannot open, they cannot be inserted directly into the middle of a crocheted fabric. Instead, you must slide them onto the shaft of your crochet hook. They sit between your active stitches, moving along the hook as you work across a row or round.
Ultimately, locking markers interact directly with the fabric, while ring-style markers interact directly with the tool. This fundamental distinction dictates which projects each type can support and how they affect your overall crocheting speed.
Key Comparison Dimensions for Crocheters
Choosing between these two marker styles requires looking at how they perform during active crocheting. The right marker should streamline your process, not introduce frustration or physical strain.

Ease of Use and Placement
The workflow for using a locking marker requires several distinct physical steps. To place one, you must open the clasp, guide the tip through the specific yarn loops of your target stitch, and snap the clasp shut. When you reach that stitch again, you must reverse the process: unlock the clasp, slide it out of the yarn, and re-lock it. While this process is highly precise, it requires fine motor skills and can be somewhat tedious or fiddly, especially when working with very small markers or stiff plastic clasps.
In contrast, using a ring-style marker is incredibly fast. You simply slide the ring onto your hook when you reach the end of a stitch repeat or round. When you come back to the marker on the next pass, you slip it from the left side of your hook to the right side and continue crocheting. There are no clasps to open, no pins to guide through tight yarn plies, and no mechanical parts to manipulate. This streamlined movement is highly beneficial for maintaining a fast, rhythmic crocheting pace.
However, this speed comes with a significant limitation in placement flexibility. Because ring markers must sit on the hook, they can only mark transitions at the exact moment you are working them. You cannot use a ring marker to retroactively mark a mistake three rows down, nor can you use it to pin two pieces of a garment together before seaming. For those tasks, a locking marker is your only viable option.
Security and Slippage Risks
Security is a major pain point for crocheters who travel with their work or store projects in bags. Locking markers offer exceptional security. Once the clasp is fully engaged, the marker is physically locked into the yarn fibers. You can toss your project into a canvas tote bag, commute on the MRT, or store your work-in-progress (WIP) in a closet for months without worrying about losing your place. Even if the active loop on your hook slips out, the locking marker remains anchored exactly where you left it. The only risk is if a cheap plastic clasp snaps under pressure or if an unpolished metal hinge snags and tears delicate fibers.
Ring-style markers carry a much higher risk of slipping off. Because they sit loosely on the shaft of the crochet hook, they are only secure while the hook is actively inside the working loops. The moment you set your hook down, tilt your work, or pack your project into a bag, the ring marker can easily slide off the end of the hook. If this happens, you lose your exact stitch count and must recount your entire row or round.
Furthermore, if you pull your active yarn loop tight to secure your project during storage, any ring markers sitting on the hook will simply fall off. This makes ring markers highly impractical for on-the-go crocheting unless you use specialized hook stoppers or point protectors to keep them in place.
Versatility Across Crochet Projects
The structure of your crochet project heavily influences which marker style will serve you best. Locking markers are the undisputed standard for amigurumi (crocheted stuffed toys). Amigurumi is worked in tight, continuous spirals of single crochet, meaning there are no distinct joins between rounds. A locking marker is essential here to mark the very first stitch of each round; as you work, you continuously move the marker up, locking it into the fabric so it cannot slide out of the tight, dense stitches.
Locking markers also excel in complex lace patterns, garment construction, and colorwork. When crocheting a sweater, you often need to mark specific points for armholes, necklines, or decrease lines directly on the fabric. Locking markers allow you to leave these indicators in place over dozens of rows, providing a clear visual map of your progress. They are also excellent for securing the active working loop when you need to step away from your project, preventing the yarn from unraveling.
Ring-style markers are far more specialized in crochet. They are best suited for large, repetitive projects worked in flat rows or simple rounds, such as blankets, shawls, or rugs. For example, if you are working a blanket with a repeating pattern of 15 stitches, you can slide a ring marker onto your hook after every 15th stitch. This creates a physical barrier on your hook that alerts you when you have reached the end of a repeat, allowing you to catch counting errors immediately without having to count every single stitch individually. They are also highly effective for counting out long foundation chains, where you can slide a ring onto your hook every 50 stitches to keep track of your progress.
Feature Comparison at a Glance
This table summarizes the physical and functional differences between locking and ring-style crochet markers to help you quickly compare their attributes.
| Feature | Locking Markers | Ring-Style Markers |
|---|---|---|
| Attachment Method | Clamps or locks directly into the yarn loops | Slides onto the shaft of the crochet hook |
| Security on Fabric | Highly secure; cannot fall off when locked | Cannot attach to fabric; will fall off if hook is removed |
| Speed of Use | Slower; requires opening and closing the clasp | Extremely fast; slides effortlessly along the hook |
| Best Project Types | Amigurumi, garments, lace, and complex shaping | Blankets, long foundation chains, and repetitive stitch repeats |
| Risk of Falling Off | Extremely low (unless the clasp breaks) | High (whenever the hook is set down or tilted) |
| Typical Materials | Molded nylon, coated steel, or brass | Polished plastic, solid metal, silicone, or wood |
| Retroactive Placement | Yes; can be added to any stitch at any time | No; must be placed while actively working the stitch |
How to Choose Based on Your Crochet Style
To determine which marker type to buy, evaluate your personal crafting habits, physical comfort, and the specific designs you enjoy making.
Choose Locking Markers if:
- You love making amigurumi or plushies: You will constantly need to mark the beginning of spiral rounds directly in the dense fabric.
- You crochet garments or complex lace: You require semi-permanent markers that can stay in the fabric over multiple rows to guide shaping, seaming, and buttonhole placement.
- You travel with your crochet: You need markers that stay locked in place even when your project is jostled inside a bag.
- You need to secure your working loops: You want a tool that can lock into your active loop to prevent your work from unraveling when you store your hook.
Choose Ring-Style Markers if:
- You primarily crochet large, flat items: You work on blankets, throws, or wide scarves with repetitive stitch patterns where speed is a priority.
- You struggle with fine motor coordination: You find opening and closing tiny plastic safety pins tedious or painful for your fingers.
- You want to mark long foundation chains: You need a quick way to count out hundreds of starting chain stitches without stopping to fiddle with clasps.
When Neither Option Fits
If your primary goal is to keep track of the total number of rows completed in a large project, neither standard stitch marker may be the right tool. In this scenario, you should look for a dedicated row counter. Row counters are separate mechanical clickers, digital finger rings, or sliding bead chains that allow you to manually advance a number tally each time you complete a row, keeping your count accurate without cluttering your fabric.
Additionally, if you are working on micro-crochet or extremely fine lace using thin sewing thread and tiny hooks (under 1.0mm), standard plastic locking markers will be far too heavy. They will stretch out your delicate stitches and distort the finished fabric. For these micro-projects, look for specialized micro-locking markers made of ultra-thin wire, or use a simple contrast-colored piece of fine embroidery floss threaded through your stitches as a running marker.
If you are a beginner who is still exploring different project types, your best option is to purchase a mixed starter pack. Many craft stores offer affordable assortments that include both locking plastic safety pins and smooth metal rings, allowing you to test both workflows on your early projects before investing in premium, specialized tools.
What to Check Before Buying Online
When shopping for crochet markers on online marketplaces, product listings can sometimes be vague or misleading. To ensure you receive a high-quality tool that matches your needs, verify these specific technical details before making a purchase.
- Size and Hook Compatibility: For ring-style markers, always check the listed inner diameter. A ring marker must have an inner diameter that is larger than the shaft of the crochet hook you plan to use. Keep in mind that ergonomic crochet hooks often feature thick rubber or silicone handles; your ring markers must be large enough to slide over these handles if you prefer to slide them on from the back. For locking markers, ensure the opening gap is wide enough to accommodate the thickness of your preferred yarn weights without splitting the plies.
- Material Finish and Snagging Risks: Inspect product photos closely for manufacturing quality. Cheaply made plastic markers often have sharp mold lines, flashing, or rough edges that can catch on delicate wool, alpaca, or acrylic fibers, causing unsightly pilling or yarn splits. Look for markers described as "seamless," "polished," or "snag-free." If buying metal locking markers, look for coated steel or brass bulb pins, which do not have exposed coil springs that can trap and tear fine yarn fibers.
- High-Contrast Visibility: Choose marker colors that contrast sharply with your yarn stash. If you frequently work with dark yarns, such as black, navy, or charcoal grey, look for neon, pastel, or bright white markers. Avoid buying dark or transparent markers, as they are incredibly difficult to spot in low-light conditions or within textured stitch patterns.
- Packaging and Storage Solutions: Locking markers are small and easily misplaced. Check if the product comes with a secure storage container, such as a partitioned plastic box, a metal tin, or a resealable pouch. Having a dedicated storage solution keeps your craft space organized and prevents loose markers from scattering at the bottom of your project bags.
Frequently Asked Questions (FAQ)
Can I use knitting stitch markers for crochet?
Yes, but with some practical limitations. Most knitting stitch markers are solid, closed rings designed to slide along knitting needles. You can use these closed-ring knitting markers in crochet by sliding them onto your crochet hook to mark stitch repeats or rounds. However, because they do not open, you cannot use them to mark a stitch directly in the crocheted fabric or to secure a working loop. Locking stitch markers, on the other hand, are universally compatible and can be used interchangeably for both knitting and crochet projects.
How do I keep ring-style markers from falling off my hook?
To prevent ring-style markers from sliding off when you set your work down, you can use a crochet hook with an ergonomic handle or a wider thumb grip, which acts as a natural physical stopper. Alternatively, you can slide a silicone needle point protector or a small rubber band onto the tip of your hook when pausing your work. This creates a temporary barrier that holds the ring markers securely on the shaft. If you find yourself constantly losing your ring markers despite these workarounds, switching to locking markers is the most reliable way to secure your stitches during storage.
Community discussion
Share your experience or ask a question. Comments are reviewed before publication.