
Creating custom packaging from acrylic sheets requires a systematic approach of precise marking, controlled cutting based on sheet thickness, and localized heating for clean structural bends. By using simple hand tools like scoring knives for thin sheets or fine-toothed saws for thicker panels, you can fabricate professional-grade display boxes, protective cases, and custom inserts right from your workspace. The key to success lies in maintaining the material’s protective masking, managing heat buildup during cutting, and using dedicated jigs to hold shapes as they cool. This guide walks through the entire process from initial layout to final assembly checks, ensuring your bespoke packaging projects look polished and function reliably.
Before starting, it is highly recommended to perform a trial run on a small scrap piece of your specific acrylic sheet. This allows you to verify how the material responds to your scoring tool, saw blade, or heat source, as different acrylic formulations can vary in their brittleness and thermal properties.
Essential Tools and Safety Gear for Working with Acrylic
To achieve clean results without damaging your acrylic sheet, assembling the correct toolkit is essential. For measuring and layout, you will need a heavy metal ruler, a non-permanent fine-tip marker, and high-quality masking tape. These tools allow you to map out your packaging dimensions directly onto the protective film without scratching the underlying plastic.
Products mentioned in this guide

10 Lazada user ratings
Item received size is correct. Item well protected with no damaged.
very good and quick delivery
very good. quick delivery
Good quality
![[SG STOCK] Clear Acrylic Sheet Cast Grade A | A6 A5 A4 A3 A2 1mm 3mm 5mm](https://img.lazcdn.com/g/p/ede8ee51ed01d5d51cf05baa78c8c553.jpg_400x400q80.jpg_.webp)
21 Lazada user ratings
Received the package in good condition. delivery was fairly fast. it fits perfectly in the frame and looks great
Clear and transparent, 50mm width for standard frames,
It's just a little small.
Too small. No use at air.
1 Lazada user ratings
Thick sturdy sheet. Bought for holding paper while watercolor painting
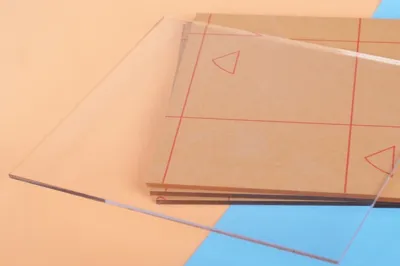
135 Lazada user ratings
2 sheets were 2mm thick. 3rd sheet is thinner. overall ok
Fast delivery. Nicely packed. Yet to use.
Received in good condition m packing

14 Lazada user ratings
Very nice. Perfect for my desktop
Quality:ok Price:ok Variety:ok
Good! No damage. Thank you
Prices are valid at publication and may change. Please refer to the product page for the latest price.
Your choice of cutting tools depends heavily on the thickness of the acrylic sheet. For sheets under 3mm thick, a specialized acrylic scoring knife is the most efficient hand tool. For thicker sheets or intricate, curved packaging designs, a fine-toothed hand saw, a jigsaw with a plastic-cutting blade, or a rotary tool is necessary.
Shaping and bending require controlled heat sources. A strip heater is ideal for straight, sharp folds, while a variable-temperature heat gun works well for free-form curves. To finish the edges, prepare a set of hand files and wet-and-dry sandpaper in progressive grits, ranging from 120-grit for initial smoothing up to 600-grit or higher for a polished finish.
Safety must be your first priority when working with acrylic. Always wear impact-resistant safety glasses to protect your eyes from flying plastic chips during cutting and sanding. Cut-resistant gloves are highly recommended when handling freshly cut sheets, as raw acrylic edges can be incredibly sharp. Finally, ensure your workspace is well-ventilated, especially when using heat guns or strip heaters, to disperse any fumes generated by heating the plastic.
Step 1: Accurately Measuring and Marking Your Acrylic Sheet
Before making any cuts, you must translate your 3D packaging design into a flat pattern layout. When calculating these dimensions, it is crucial to account for material loss, known as the kerf, which is the width of the cut made by your saw blade. For projects involving bent corners, you must also factor in the bending radius; heating and folding acrylic slightly stretches the outer edge and compresses the inner edge, which can alter your final dimensions if not planned for.

Always leave the factory-applied protective film or paper masking intact on both sides of the acrylic sheet during the entire measuring and marking process. This protective layer acts as a shield against accidental scratches from metal rulers, tools, or work surfaces. If the sheet arrived without masking, or if the original film has peeled away, apply wide painter’s masking tape over the intended cut lines to protect the surface.
To draw your layout, align a heavy metal straightedge along your measurement marks and use a non-permanent marker to trace the lines. Avoid using metal scribes or utility knives to draw layout lines unless you intend to cut along them immediately, as any accidental scratch on the acrylic surface can create a permanent blemish or an unintended fracture point. Secure the straightedge with clamps to prevent it from slipping while you draw.
Once your layout is complete, perform a dry-fit check using paper or cardboard templates if your packaging design is complex. Cutting a mock-up from cheap cardstock allows you to verify that all tabs, slots, and panels align correctly before committing to your acrylic sheet. Double-check every measurement against your design plan, remembering the old workshop adage to measure twice so you only have to cut once.
Step 2: Clean Cutting Techniques for Different Thicknesses
Selecting the right cutting method is a critical decision that depends on the thickness of your acrylic sheet and the complexity of your packaging shapes. Thinner sheets, typically those under 3mm, are best suited for the scoring and snapping method, which produces straight lines quickly and cleanly without generating heat or plastic dust. Thicker sheets, or any designs requiring curved cuts and intricate cutouts, demand mechanical sawing.
Regardless of the method you choose, securing the workpiece is vital to prevent vibration, which is the primary cause of chipping and cracking. Clamp the acrylic sheet firmly to your workbench, placing a scrap piece of wood or cardboard between the clamp and the sheet to protect the plastic from pressure marks. Ensure the cut line is positioned close to the edge of the workbench to minimize flexing, but leave enough clearance for your tools to move freely.
During any cutting operation, establish clear stop conditions to protect your material. If you notice the acrylic beginning to melt, bind against the blade, or emit a strong odor, pause immediately. Let the tool and the material cool down completely before proceeding, and adjust your cutting speed or pressure to prevent further heat buildup.
Scoring and Snapping for Thin Sheets
The scoring and snapping technique is the most accessible way to cut thin acrylic sheets along straight lines. Begin by placing your metal straightedge precisely along the marked cut line and clamping it securely to the sheet. Hold your acrylic scoring knife at a slight angle and draw it firmly along the straightedge, scoring through the protective film and into the plastic surface.
You must repeat this scoring motion multiple times to create a deep, clean groove. For a successful snap, aim to score approximately one-third of the way through the thickness of the sheet. Avoid rushing this step; applying moderate, consistent pressure over ten to fifteen passes is far more effective and safer than trying to cut deeply in just two or three heavy strokes.
Once the groove is sufficiently deep, position the acrylic sheet so that the scored line aligns perfectly with the sharp edge of your workbench. Clamp the supported side of the sheet firmly to the table. Wearing safety glasses and gloves, place one hand flat on the overhanging section close to the cut line, and apply quick, even downward pressure. The sheet will snap cleanly along the scored line, leaving a straight, relatively smooth edge.
Sawing for Thicker Sheets and Complex Shapes
When working with acrylic sheets thicker than 3mm, or when your packaging design requires curves, circles, or interlocking tabs, sawing is the necessary approach. For straight cuts, a circular saw or table saw equipped with a blade designed specifically for plastics is ideal. For curved or custom shapes, a jigsaw or scroll saw with a fine-toothed blade works best. Look for blades with a high tooth count, typically 10 to 14 teeth per inch (TPI) for jigsaws, to ensure a smooth finish.
Managing heat buildup is the greatest challenge when sawing acrylic, as the friction of the blade can easily melt the plastic, causing it to fuse back together behind the cut or bind the blade. To prevent this, maintain a steady, moderate feed rate; pushing too fast causes chipping, while moving too slowly generates excessive heat. If your tool allows, select a lower speed setting to keep temperatures down.
If you are making long cuts or working with particularly dense sheets, pause periodically to let both the blade and the acrylic cool. You can also apply a plastic-safe lubricant or a light mist of water to the cut line if recommended by your tool manufacturer to reduce friction. Always support both sides of the cut line to prevent the waste piece from dropping prematurely, which can cause the corner of your sheet to splinter or crack just as you finish the cut.
Step 3: Shaping and Bending Acrylic for Packaging Structures
Bending acrylic allows you to transform flat sheets into elegant, seamless packaging structures like display stands, U-shaped covers, or folded boxes. This process relies on thermoplastic properties: when heated to its softening point, acrylic becomes highly pliable, allowing it to be bent into almost any shape, which it then retains once cooled. The two primary tools for this are strip heaters for straight, localized folds and heat guns for broader, free-form curves.
For straight-line bends, a strip heater is the most precise tool because it applies intense heat only along a narrow path. Place the marked bend line directly over the heating element, keeping the protective masking removed only from the immediate heating zone to prevent the film from melting onto the plastic. If you are using a heat gun instead, sweep the nozzle continuously back and forth along the bend line from a distance of about 10 to 15 centimeters, ensuring you heat both sides of the sheet evenly to avoid warping.
To achieve professional, repeatable results, construct a simple bending jig or form from scrap wood before you begin heating. A jig holds the softened acrylic at the exact angle required—such as a perfect 90-degree corner—while it cools. Once the acrylic reaches a pliable, leather-like consistency, quickly transfer it to your jig, bend it firmly against the form, and hold it in place.
Monitoring the material’s temperature is critical to avoiding common aesthetic defects. If you overheat the acrylic, tiny bubbles will form inside the plastic, or the surface will begin to scorch and discolor, ruining its optical clarity. Conversely, attempting to bend the sheet before it is sufficiently softened will create high internal stress, leading to immediate cracking or gradual crazing over time. Always consult the guidelines provided by your acrylic manufacturer for recommended heating times based on your sheet’s thickness. Hold the bent piece in your jig until it has cooled completely to room temperature, as releasing it too early will cause the angle to spring back and lose its shape.
Step 4: Smoothing Edges and Final Assembly Checks
Freshly cut or snapped acrylic edges are often sharp, rough, and visually cloudy, which can detract from the premium feel of custom packaging. Finishing these edges is essential for both user safety and aesthetic appeal. Begin the finishing process by using a hand file or a specialized deburring scraper to quickly shave down any prominent saw marks, ridges, or sharp burrs along the corners.
Once the major imperfections are removed, transition to wet-or-dry sandpaper wrapped around a hard sanding block to keep the edges flat and square. Start with a medium grit, such as 120-grit or 240-grit, to smooth out the remaining tool marks. Progressively work your way through finer grits, including 320-grit, 400-grit, and finally 600-grit. Adding a few drops of water during the finer sanding stages acts as a lubricant, preventing heat buildup and producing an incredibly smooth, satin-like edge.
With all individual panels cut, shaped, and smoothed, conduct a comprehensive dry-assembly check of your packaging project. Without applying any adhesives, arrange the pieces together to verify that all joints align perfectly, tabs fit snugly into their corresponding slots, and any lids or moving parts have adequate clearance. This step allows you to make minor adjustments with a file or sandpaper before final bonding.
Only after you have verified the fit and are ready for the final assembly should you peel away the remaining protective masking film. Removing the film at the very last moment ensures that your custom packaging remains entirely free of fingerprints, dust, and accidental scratches during the intensive fabrication process. Wipe the finished assembly down with a soft microfiber cloth and a mild, anti-static plastic cleaner to showcase its crystal-clear clarity.
Troubleshooting Common Acrylic Fabrication Mistakes
Chipped or melted edges are among the most common issues encountered during acrylic cutting. If your edges are chipping, it is usually a sign of excessive vibration, using a blade with teeth that are too coarse, or feeding the material too quickly. To correct this, ensure your clamps are secure and switch to a blade designed for plastics. Melted edges, on the other hand, indicate excessive heat buildup; resolve this by slowing down your tool’s cutting speed, pausing frequently to let the blade cool, or clearing away packed plastic dust from the cut path.
Uneven or failed bends typically occur when the heat has not been distributed uniformly along the fold line. If the bend is wavy or cracked on the outer radius, the material was likely too cold when you attempted to fold it. Ensure you heat the sheet thoroughly on both sides, especially for thicknesses over 3mm, and verify its flexibility before bending. If the bend springs back out of shape, you may have released it from your jig before it had cooled completely; always allow the plastic to return to room temperature before removing support.
Surface scratches can happen even with careful handling. If you discover light scratches on your finished packaging, you can often restore the clarity using a specialized plastic polishing compound and a soft microfiber cloth. Apply the polish in circular motions with moderate pressure until the scratch fades. For deep scratches that you can catch with a fingernail, you will need to sand the area locally with ultra-fine wet sandpaper (1000-grit or higher) before applying the polish, or replace the panel if the structural integrity is compromised.
Frequently Asked Questions (FAQ)
Can I use a standard utility knife to cut thick acrylic sheets?
No, standard utility knives are not suitable for cutting thick acrylic sheets. Their blades are too thin and flexible, which can easily lead to tool slippage, uneven cuts, or personal injury. Furthermore, utility knives lack the specialized hooked tip of an acrylic scoring knife, making it extremely difficult to score a deep enough groove to achieve a clean snap on sheets thicker than 2mm. For thicker materials, always use a dedicated scoring tool or a fine-toothed saw.
How do I prevent acrylic from melting or chipping while cutting?
To prevent melting and chipping, always use sharp, fine-toothed blades specifically rated for plastics and maintain a steady, moderate feed rate. Keep your workpiece clamped tightly to a stable surface close to the cut line to eliminate vibration. Additionally, leave the protective masking film on the sheet during cutting, and periodically pause your tool to allow both the blade and the acrylic to cool down, clearing away any accumulated plastic debris.

Community discussion
Share your experience or ask a question. Comments are reviewed before publication.