
When setting up your Brother embroidery machine, selecting the correct needle is the single most important decision for ensuring clean stitches and preventing frustration. For most beginners, the ideal starting point is a standard 75/11 embroidery needle. This specific size and type are designed to handle standard 40-weight polyester embroidery thread, which is the industry standard for most decorative designs. Starting with this baseline allows you to master the basics of hooping and stabilizing before moving on to more complex fabric and thread combinations.
Choosing the right needle involves understanding how the needle interacts with your machine, your thread, and your fabric. While it is tempting to use whatever needle is already inserted in the machine, embroidery demands a specialized design. A proper embroidery needle features a unique construction, including a larger eye and a specific groove, which protects delicate embroidery threads from shredding at high speeds. By learning how to match your needle to your project, you can avoid common pitfalls like skipped stitches, puckered fabric, and frequent thread breaks.
Assess Your Fabric, Thread, and Machine Setup
Before purchasing a needle, evaluate your project’s variables. The fabric acts as the foundation, dictating the required needle point. Woven fabrics like cotton muslin, linen, or canvas have threads crossing at right angles, requiring a sharp or slightly rounded needle to pierce fibers cleanly. Conversely, knit fabrics like jersey or fleece feature looped structures that can run if cut. For these stretchy materials, a ballpoint needle is necessary to slide between fibers rather than piercing them.
Products mentioned in this guide
![[SG Stock] Original Authentic Brother Brand Sewing Machine 3-Piece Needle Set](https://img.lazcdn.com/g/p/ab0dea7a9da028223a6a40c8155859bb.jpg_400x400q80.jpg_.webp)
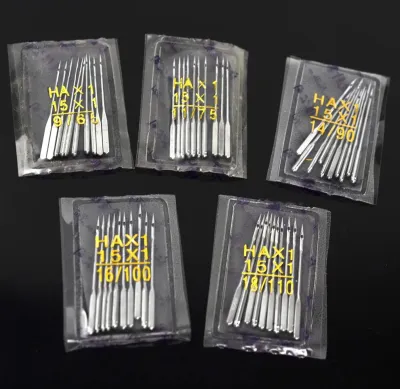
Prices are valid at publication and may change. Please refer to the product page for the latest price.
Your embroidery thread also differs from standard sewing thread. Most designs are digitized for 40-weight polyester or rayon thread. This thickness requires a needle eye large enough for the thread to pass through without friction. If you use thicker specialty threads, like 30-weight cotton or metallic threads, you must adjust your needle size. A needle eye that is too small causes immediate shredding, tension issues, and thread breaks at high speeds.
Finally, verify needle compatibility with your Brother machine. Most domestic Brother models use the standard 130/705H or HAx1 needle system. These needles feature a flat shank on one side, ensuring correct insertion. Always consult your manual to confirm this system. Using incorrect needles, such as industrial round-shank variants, can damage the needle bar, hook mechanism, or needle plate, leading to costly repairs.
Choose the Right Brother Needle Type for Your Project
After assessing your materials, select the needle type that matches your project. Standard embroidery needles are the workhorses of machine embroidery, featuring a slightly rounded point and an enlarged eye. This highly versatile design suits a wide range of woven fabrics and standard threads. The slightly rounded point passes smoothly through woven fibers without tearing them, while the large eye minimizes friction, ensuring smooth stitch formation at high speeds.

Advanced projects may require specialty needles. For example, delicate metallic threads prone to stripping require metallic needles, which feature an even larger, polished eye and a deeper groove. Titanium-coated needles are another option, treated to resist heat and wear. These are useful for dense designs, heavy fabrics, or adhesive stabilizers that gum up standard needles. The coating helps the needle glide through sticky residues and maintain sharpness longer than standard chrome needles.
To ensure you use the correct needle, learn to read the packaging and the needle itself. Packages state the needle type, size, and application. Many manufacturers also use a color-coding system on the needle shoulder to indicate type and size. For instance, one color band might represent the needle type (like red for embroidery) and a second band represents the size. Familiarizing yourself with these markings prevents mix-ups, ensuring you do not accidentally use a standard sewing needle.
Select the Correct Needle Size to Prevent Breakage
Understanding needle sizing is crucial for professional results and preventing machine issues. Needle sizes are expressed using two numbers, such as 75/11 or 90/14. The first number is the metric size (shaft diameter in hundredths of a millimeter), while the second is the US size. A smaller number indicates a finer needle, while a larger number indicates a thicker needle. For lightweight fabrics like organza, a fine 70/10 needle prevents visible holes. For medium-weight quilting cotton, a 75/11 needle is standard, while heavy denim or canvas requires a robust 90/14 needle.
Matching needle size to thread thickness is as important as matching it to the fabric. The front of an embroidery needle features a long groove that cradles the thread. If the needle is too small, the thread will not fit securely within this groove, exposing it to excessive friction against the fabric. This friction quickly shreds the thread, leading to snapping. Conversely, a needle that is too large creates holes in the fabric that the thread cannot fill, resulting in loose stitches and visible gaps.
As a beginner, monitor your machine for signs of an incorrect needle size. Visible holes in the fabric around the stitches indicate the needle is too large. Puckering around the design, even when properly stabilized, also suggests the needle is too thick, forcing fibers apart and distorting the weave. Conversely, if you experience frequent thread snapping, skipped stitches, or a shredded thread tail at the eye, your needle is likely too small for the thread weight.
Buying, Installing, and Knowing When to Replace
When purchasing needles, use a verification checklist. First, confirm the package is labeled for machine embroidery, not standard sewing. Second, verify the needle system matches the 130/705H or HAx1 standard specified in your Brother manual. Third, select a reputable brand, as low-quality needles often have rough eyes that shred thread. It is wise to purchase a multi-pack containing various sizes, such as 75/11 and 90/14, giving you the flexibility to handle different fabric weights as you experiment.
Installing the needle correctly is vital for proper stitch formation. Turn off your machine before changing the needle to prevent injury. Loosen the needle clamp screw, remove the old needle, and insert the new one with the flat side of the shank facing the back of the machine. Push the needle up fully into the needle bar before tightening the screw. An improperly inserted needle alters timing, leading to skipped stitches, thread breaks, or bobbin collisions.
Knowing when to replace your needle is a key skill. Needles are consumable items that wear out over time. As a general rule, replace your needle after approximately 6 to 8 hours of stitching time, or at the start of every major project. Replace it immediately if you observe warning signs. A dull or bent needle makes a distinct popping or thumping sound as it pierces fabric. Other signs include degraded stitch quality, skipped stitches, or sudden thread breaks. Changing the needle first resolves a significant percentage of common embroidery problems.
Frequently Asked Questions (FAQ)
Can I use standard sewing needles for machine embroidery?
While standard sewing needles can physically fit into your Brother machine, they are not recommended for embroidery. Standard sewing needles have a smaller eye and a different groove geometry compared to dedicated embroidery needles. The high speed of embroidery machines creates significant friction, and a standard needle’s small eye will quickly shred or break delicate embroidery threads. Using a dedicated embroidery needle ensures smooth thread delivery and prevents damage to both your thread and fabric.
How often should a beginner change their embroidery needle?
A beginner should change their embroidery needle after every 6 to 8 hours of continuous stitching, or at the start of a new, complex project. Additionally, you must replace the needle immediately if it strikes a hoop, hits a pin, or if you hear a distinct popping sound as it pierces the fabric. Using a fresh needle is the easiest way to maintain high stitch quality and prevent unexpected thread breaks.
Why does my embroidery thread keep breaking even with a new needle?
If your thread continues to break with a fresh needle, the issue may lie in your machine setup or materials. Check that your upper thread path is completely clear of lint and that the thread is feeding smoothly off the spool without catching. Verify that you are using the correct stabilizer for your fabric weight and that your fabric is hooped drum-tight. Finally, check the bobbin area for accumulated lint or small thread pieces, which can disrupt tension and cause breakage.
Community discussion
Share your experience or ask a question. Comments are reviewed before publication.