
A diamond painting correction tool is a specialized accessory designed to adjust, realign, or remove misplaced resin or acrylic drills on a sticky canvas. When a drill is placed slightly off-center or in the wrong color block, attempting to slide it with a standard applicator pen often smears the placement wax or damages the surrounding adhesive. The ideal correction tool allows you to lift or nudge the misplaced drill cleanly without stripping the canvas’s adhesive layer. Choosing the right tool depends on the drill shape, the density of the surrounding drills, and the type of adhesive used on your canvas.
In regions with warm, humid climates, such as Singapore, canvas adhesives can become softer and more pliable. This makes drills easier to slide but also increases the risk of the adhesive stringing or lifting off the canvas backing. Conversely, in air-conditioned rooms, the adhesive remains firm and rigid, requiring a more deliberate, steady pressure to release the drill without cracking the acrylic. Understanding these environmental factors and matching them with the correct tool ensures your canvas remains pristine throughout your crafting project.
Understanding Diamond Painting Correction Tools
Standard diamond painting kits typically include a basic wax pen or a multi-placer tool. While these applicators are excellent for picking up loose drills and pressing them onto the canvas, they are not designed for corrective work. Standard pens rely on downward pressure and a light release mechanism. Attempting to use them to pry up a stuck drill usually results in the wax tip breaking off, leaving a stubborn residue on the drill’s facets that dulls its sparkle.
Products mentioned in this guide
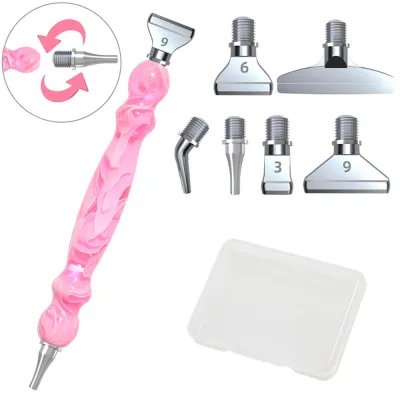

Prices are valid at publication and may change. Please refer to the product page for the latest price.
Dedicated correction lifters are engineered specifically to overcome the strong bond of canvas adhesive. These tools feature specialized tips—such as ultra-fine metal edges, angled scrapers, or high-traction silicone—designed to slide beneath or firmly grip a single drill. By applying targeted leverage or friction, they allow you to isolate the misplaced drill without disturbing the surrounding pieces.
Preserving the canvas adhesive is the primary goal of any correction process. Canvas adhesive is typically applied as a layer of poured glue or double-sided adhesive tape. If you pull a drill straight up with too much force, you risk peeling this sticky layer off the canvas backing, leaving a bald spot where new drills will not adhere. Specialized correction tools use specific physical mechanisms to break the adhesive bond safely.
These tools generally operate through three main mechanisms: mechanical leverage, high-friction grip, and localized shearing. Mechanical leverage involves wedging an ultra-thin blade under the drill to lift it from below. High-friction grip uses flexible materials like silicone to grasp the top of the drill and twist it free. Localized shearing involves sliding the drill horizontally to break the bond before lifting it away. Selecting the right mechanism depends on how tightly packed your drills are.
Types of Tools for Removing and Repositioning Drills
Precision tweezers are among the most common and effective tools for edge lifting and vertical extraction. Typically made of stainless steel, these tweezers feature extremely fine, sharp, and aligned tips. Angled tweezers are particularly useful because they allow you to reach into tight spaces at a comfortable hand angle. They excel at grabbing a single square drill by its sides and lifting it straight up, which is crucial when working on full-drill canvases where there is no room to slide the piece. However, they require a steady hand; a sudden slip can scratch the drill’s facets or puncture the canvas fabric.

Silicone-tipped or rubber-tipped lifters offer a gentler, non-invasive alternative to metal tweezers. These tools feature a flexible, high-friction tip that conforms to the faceted top surface of a round or square drill. By applying light downward pressure and a slight twisting motion, you can break the adhesive bond and lift the drill without using sharp metal. These lifters are highly recommended for delicate drills, such as those with special coatings, though they may struggle to grip drills that are tightly wedged between other pieces.
Adhesive putties and specialized lifting tapes are designed for flat extraction, making them ideal for clearing small sections of misplaced drills in open areas. This method relies on a high-tack temporary adhesive on the tool tip that is stronger than the canvas adhesive. When pressed onto the top of the misplaced drills and pulled away quickly, the drills lift off the canvas. While highly efficient for open areas, this method is less precise and is not suitable for tightly packed sections where neighboring, correctly placed drills might be accidentally removed.
Alignment scrapers and slide adjusters are wide, flat plastic or metal blades used to push entire rows of drills into alignment. While they do not lift the drills off the canvas, they are essential for correcting crooked lines of square drills. By sliding the flat edge of the scraper between the rows, you can gently nudge multiple drills into perfect alignment simultaneously. This tool is highly effective for maintaining straight grid lines over large sections of your painting.
Key Features to Evaluate Before Buying
When selecting a diamond painting correction tool, the balance between grip strength and adhesive preservation is critical. The tool must exert enough force on the drill to overcome the canvas adhesive, but its physical design should minimize contact with the sticky canvas layer. Metal tools should have ultra-thin, polished profiles to prevent them from scraping up the glue, while flexible tools should use non-reactive silicone that does not bond permanently to the canvas adhesive.
Ergonomics and tip precision are equally important, especially during long crafting sessions. Look for tools with padded, non-slip grips or ergonomic handles that reduce hand fatigue and finger cramping. The tip must be precise enough to isolate a single 2.5mm square drill or 2.8mm round drill without touching the adjacent pieces. A tip that is too wide will disturb neighboring drills, while a tip that is too blunt will fail to slide under a tightly wedged drill.
Compatibility with different drill sizes and shapes is another key consideration. Standard round and square drills have different profiles and spacing. Square drills fit tightly together with virtually no gaps, requiring ultra-fine metal tweezers or thin alignment scrapers for correction. Round drills leave small gaps at their corners, allowing more room for silicone-tipped lifters or angled tweezers. If your project features large, special-shaped crystals or teardrop drills, ensure your correction tool has a wide enough grip or a flexible tip to accommodate these non-standard dimensions.
Step-by-Step Guide to Fixing Misplaced Drills Safely
To fix a misplaced drill without damaging your canvas, follow this systematic process:
- Assess the Position and Lighting: Place your canvas on a flat, stable surface under bright, direct light. Using a light pad beneath the canvas is highly recommended, as it highlights the gaps between drills and makes misplaced pieces stand out. Identify whether the misplaced drill is surrounded by other pieces or sits in an open area.
- Choose the Correct Angle of Approach: If using precision tweezers, hold them at a low angle (approximately 15 to 30 degrees relative to the canvas). Slide the tips horizontally along the canvas surface, positioning them just beneath the widest part of the drill. Do not push downward into the canvas backing, as this can puncture the fabric or tear the adhesive film.
- Apply Gentle Pressure and Lift: Squeeze the tweezers firmly to grip the drill. Gently lift the drill straight upward. If using a silicone-tipped lifter, press the tip flat against the top of the drill, twist it slightly clockwise to shear the adhesive bond, and then lift. Never rip the drill off quickly, as sudden force is more likely to tear the adhesive layer.
- Clean Residual Wax or Adhesive: Removing a drill can sometimes leave behind a small smear of placement wax or a stretched string of canvas glue. Use a clean, dry toothpick or a fine-tipped plastic tool to gently roll away this residue. Avoid using liquid solvents, alcohol, or acetone on the canvas, as these chemicals will permanently dissolve the canvas adhesive and warp the fabric.
- Monitor Canvas Integrity: Pay close attention to the adhesive layer during the removal process. If you notice the sticky film lifting off the canvas backing, creating a bubble, or peeling at the edges, stop immediately. Do not force the drill off. Instead, gently press the adhesive back down with a clean finger and use a sliding motion to nudge the drill sideways rather than pulling it vertically.
Maintenance and Care for Your Correction Tools
Proper maintenance ensures your correction tools remain effective and do not transfer dirt, oils, or old wax to your canvas. Silicone and rubber tips naturally collect dust, skin oils, and stray placement wax over time, which severely reduces their gripping power. Wash these tips gently with mild dish soap and lukewarm water. Allow them to air dry completely before using them again; do not wipe them with paper towels or tissues, as these will leave fine lint fibers on the sticky silicone surface.
Storing your tools correctly prevents physical damage and contamination. Fine metal tweezers are easily bent or misaligned if dropped or stored loosely in a drawer. Always slide the protective plastic cap back over the tips of your tweezers when they are not in use. Store all your correction tools in a dedicated pencil case, zippered pouch, or desktop organizer stand, keeping them away from direct sunlight, high heat, and dusty environments.
Recognizing when a tool has degraded is essential for protecting your canvases. While high-quality stainless steel tweezers can last for years if they are not dropped, silicone tips and adhesive putties have a finite lifespan. If a silicone tip becomes stiff, cracked, or loses its tack even after a thorough washing, it is time to replace the tip or the tool. Using a degraded tool increases the risk of slipping and damaging your artwork.
Frequently Asked Questions (FAQ)
Can I use regular household tweezers instead of a specialized correction tool?
Regular household tweezers are generally not recommended for diamond painting corrections. Most household tweezers have thick, blunt, or serrated tips designed for gripping hair or small objects, rather than flat-bottomed acrylic drills. These thick tips cannot easily slide between tightly packed drills and are highly likely to scrape the canvas adhesive or scratch the shiny facets of your drills. If you must use household tweezers in an emergency, ensure they have smooth inner jaws and a very fine point, and only use them on the outer edges of your painting where there is sufficient room to maneuver without disturbing adjacent drills.
What should I do if the canvas adhesive gets damaged while removing a drill?
If a small patch of canvas adhesive peels off or loses its stickiness during correction, you can repair it using localized remedies. Apply a tiny dot of specialized craft glue or a small patch of double-sided adhesive sheet directly to the bare spot. Use a clean toothpick to spread the glue into a paper-thin layer, ensuring it does not spill over onto the surrounding drills. Let the glue sit until it becomes tacky—usually a few minutes, depending on the product instructions—before placing your replacement drill. Never use superglue, hot glue, or standard school glue, as these can warp the canvas, damage the drills, or fail to hold over time.
Are correction tools safe to use on special-shaped or AB drills?
Correction tools can be used on special-shaped and Aurora Borealis (AB) drills, but they require extra care. AB drills feature a delicate, iridescent coating on their surface that can easily scratch, dull, or peel if subjected to harsh metal tools. For these delicate pieces, avoid using metal tweezers on the top facets of the drill. Instead, use a soft silicone-tipped lifter or gently nudge them from the base using a plastic alignment tool. Always verify that your tool’s tip size matches the unique dimensions of larger crystal or teardrop drills before applying pressure, and work slowly to preserve the specialized finish.
Community discussion
Share your experience or ask a question. Comments are reviewed before publication.