
Starting pottery does not require a massive financial investment or a room full of heavy machinery. By focusing on a few versatile hand tools, you can master the foundational techniques of hand-building and wheel-throwing. A minimalist starter kit allows you to understand how clay responds to pressure, moisture, and friction before you commit to specialized gear. This approach keeps your initial costs low and prevents your workspace from becoming cluttered with tools you rarely use.
When you first step into a pottery studio or set up a small table at home, the sheer variety of equipment can feel overwhelming. However, most professional potters rely on a core set of simple hand tools for the majority of their work. By learning how to select and use these essential items, you can build a solid foundation in the craft while keeping your budget intact.
Core Hand Tools Every Beginner Needs
A wire clay cutter and a sponge are the first two items you will reach for during any pottery session. A wire clay cutter is indispensable for slicing large blocks of clay from the bag and cutting finished pieces off the wheel head or bat. When selecting a wire cutter, look for a high-tensile stainless steel wire or a braided nylon cord. Braided wires offer a textured cut that can reveal hidden air pockets in your clay, while smooth wires provide a clean, flat slice. The handles should be securely toggled, preferably made of hardwood or durable plastic that fits comfortably in your palm without slipping.
Products mentioned in this guide
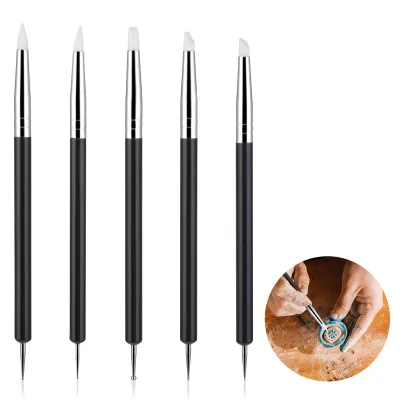
Prices are valid at publication and may change. Please refer to the product page for the latest price.
For the sponge, skip standard household cleaning sponges, which are often too abrasive and disintegrate quickly when exposed to rough clay bodies. Instead, select a dense, fine-pored synthetic sponge or a natural silk sponge. A high-quality pottery sponge holds an optimal amount of water without flooding the clay, allowing you to control moisture levels precisely during throwing or hand-building. It is also used to smooth rims, clean up wet surfaces, and absorb excess water from the inside of tall vessels.
Wooden modeling tools and ribs are essential for shaping, smoothing, and compressing clay. Wooden modeling tools come in various shapes, often featuring a flat spatula end on one side and a pointed or curved tip on the other. When purchasing, run your fingers along the edges to check for wood grain smoothness; any splinters or rough patches will transfer directly onto your wet clay, leaving unwanted marks. Hardwoods like boxwood or cherry are preferred for their natural water resistance and durability.
Ribs, which can be wooden, rubber, or metal, are used for smoothing, shaping, and compressing clay walls. For beginners, a medium-stiff wooden rib with a flat edge and a smooth curve is highly versatile. It helps compress the bottom of a vessel to prevent S-cracks and refines the exterior profile of hand-built pots. A flexible rubber rib is also excellent for final smoothing and removing finger ridges on the wheel.
Trimming is the process of carving away excess clay from the bottom of a pot once it has dried to a leather-hard state. Loop and ribbon tools are the primary instruments for this task. Loop tools feature a heavy-gauge round or shaped wire attached to a wooden handle, making them ideal for removing large ribbons of clay from the base of a pot. Ribbon tools use a thinner, flat steel band with sharpened edges, which is excellent for precise, detailed carving and refining foot rings. When evaluating these tools, check the stiffness of the wire; if the loop bends easily under light finger pressure, it will struggle to cut through leather-hard clay and may chatter, leaving uneven ridges.
A needle tool consists of a sharp, rigid metal needle set into a wooden or metal handle. It is essential for measuring wall thickness, trimming uneven rims on the wheel, and scoring clay surfaces before joining them with slip. Ensure the needle is firmly seated in the handle without any wobble, as a loose needle makes precise work difficult.
A fettling knife features a long, flexible blade designed for trimming excess clay, cutting slabs, and carving. Unlike kitchen knives, a fettling knife has a blunt edge that is safe to handle but thin enough to slice through wet clay without dragging or distorting the shape. Look for a blade with moderate flexibility that springs back to its straight form after bending, ensuring clean cuts every time.
Choosing the Right Clay and Workspace Basics
Before purchasing clay, read the manufacturer’s product label carefully to match the clay body to your firing capabilities. Clay is generally categorized by firing temperature: earthenware (low-fire), stoneware (mid-to-high-fire), and porcelain (high-fire). If you plan to fire your work at a local community studio, ask them what temperature range they fire to—usually Cone 5 or 6 for mid-fire stoneware, or Cone 10 for high-fire. Using a low-fire clay in a high-fire kiln will cause your piece to melt, potentially ruining the kiln shelves and other artists’ work.

Additionally, check the shrinkage rate, which typically ranges between 10% and 15%, and identify whether the clay contains grog. Grog consists of pre-fired clay particles that add structural strength and reduce shrinkage, making it excellent for hand-building. However, highly grogged clay can be abrasive on beginner hands during wheel throwing. If you do not have access to a kiln, ensure you are buying dedicated air-dry clay, though keep in mind that air-dry clay is not food-safe or waterproof.
Clay contains fine silica particles that can become airborne when dry, posing a respiratory hazard over time. To set up a safe home workspace, avoid working directly on polished wood or porous household tables. Instead, cover your work surface with a heavy-duty canvas cloth, a silicone pastry mat, or a sheet of marine-grade plywood. Canvas is excellent for hand-building because it absorbs excess moisture and prevents wet clay from sticking, allowing you to roll out slabs easily. However, canvas must be cleaned regularly by wiping it down with a damp sponge rather than shaking it out, which would release harmful silica dust into your living space.
Never wash clay down a standard household sink, as the heavy particles will settle in the P-trap and cause severe plumbing blockages. Implement a simple three-bucket cleaning system to manage water and slip. The first bucket is for rinsing the bulk of the clay off your hands and tools. The second bucket is for a clean rinse, and the third is for final washing. Over time, the clay in the first bucket will settle to the bottom, leaving clear water at the top. You can siphon off the clear water and reclaim the settled clay slip for future projects, keeping your plumbing safe and minimizing material waste.
Tools You Can Skip or Delay Buying
While watching a potter throw on a wheel is mesmerizing, purchasing an electric wheel immediately is rarely practical for a beginner. High-quality wheels require a significant financial investment, often starting around S$1,000, and demand dedicated space with easy-to-clean floors and walls due to flying clay slip. Extruders, which press clay through dies to create uniform coils or tubes, are also highly specialized and take up valuable studio space. Focus instead on mastering hand-building techniques like pinching, coiling, and slab construction, which require minimal space and build a deep intuitive understanding of clay consistency.
Operating a personal kiln requires specialized electrical wiring, proper ventilation to exhaust toxic fumes, and a substantial upfront cost. Similarly, professional glazing equipment like spray booths, air compressors, and large glaze vats are unnecessary for those starting out. Instead, look for local community studios or maker spaces that offer firing services. Many studios allow non-members to rent kiln space by the shelf or by weight, which is a highly cost-effective way to fire your early creations while learning the ropes.
It is tempting to buy large, 30-piece pottery tool kits sold online for very low prices. However, these kits often contain duplicate tools of inferior quality. The wooden handles are frequently unsealed, leading to splintering and mold growth when exposed to water, while the metal components are prone to rusting or snapping at the joints. A smaller, curated selection of five or six high-quality individual tools will serve you far better and last years longer than a cheap, oversized bundle.
How to Evaluate Tool Quality and Materials
When selecting tools, prioritize materials that can withstand constant exposure to water and abrasive clay. For metal parts, stainless steel or brass is highly recommended because they resist rust and corrosion. If you choose carbon steel tools, be prepared to dry them thoroughly after every session. Wooden tools should be made of dense hardwoods and finished with a water-resistant sealant. Plastic tools are lightweight and easy to clean, but they can sometimes have sharp manufacturing seams that scratch the clay; look for molded plastics with smooth, rounded edges.
Pottery requires sustained hand pressure, so tool ergonomics are crucial for preventing hand fatigue and strain. Hold the tool as you would during use. The handle should feel balanced—neither too top-heavy nor too light. A slightly thicker handle can be easier to grip for those with joint pain, while textured wooden or textured rubber grips prevent the tool from slipping out of wet, clay-covered hands.
Inspect the cutting edges of your loop, ribbon, and carving tools. The edges should be clean and free of metal burrs, which can leave unwanted scratches on your clay surfaces. Check the connection point where the metal loop meets the wooden handle; it should be tightly crimped or secured with a metal ferrule. Any play or wobble in the joint will make precise carving impossible and indicates that the tool may break under pressure.
Building Your Starter Kit on a Budget
To get the best value, compare the cost of a basic 8-piece starter kit from a reputable pottery brand against buying the items individually. Often, a high-quality, brand-name starter kit (which usually includes a wire cutter, sponge, wooden rib, metal rib, needle tool, loop tool, ribbon tool, and wood modeling tool) is priced very reasonably—frequently under S$30 to S$40. If you already own some of these items or want to customize your kit, buying individual pieces allows you to invest more in the tools you will use most, such as a premium trimming loop tool.
You do not need to buy every tool from an art supply store. Many common household items make excellent pottery tools. An expired plastic membership card or credit card can be cut into custom shapes to serve as a flexible rib for smoothing clay. A metal kitchen fork is perfect for scoring clay joints, while an old wooden spoon can be used to paddle hand-built pots into symmetrical shapes. Always ensure that any kitchen utensils repurposed for pottery are permanently retired from food preparation to avoid ingesting clay minerals or glaze chemicals.
Before ordering tools online, visit local art supply shops or pottery studios. Studio instructors can often recommend specific tools suited to the local clay bodies available in your area. Some community studios also sell used tools at a discount or have a communal bin where you can try out different tool shapes before buying your own. Engaging with the local pottery community can also lead to finding second-hand equipment like banding wheels or bats at a fraction of their retail price.
Frequently Asked Questions (FAQ)
Can I use regular kitchen knives instead of a fettling knife?
While a regular kitchen knife can cut clay, it is not an ideal substitute for a dedicated fettling knife. Kitchen knives typically have a wedge-shaped cross-section designed to push food apart, which can cause wet clay to drag, tear, or distort as you cut. In contrast, a fettling knife has a thin, flat, and highly flexible blade that slices through clay with minimal resistance. Furthermore, using kitchen knives for pottery introduces a safety risk; clay and glazes contain silica, heavy metals, and other minerals that are difficult to clean completely from micro-scratches on the blade, making them unsafe for subsequent food preparation.
How do I clean and maintain my metal loop tools to prevent rust?
To prevent rust and extend the lifespan of your metal loop tools, establish a simple cleaning routine after every pottery session. Begin by rinsing off all clay residue under running water, using an old toothbrush to gently clear clay from the crevices where the metal meets the wooden handle. Avoid leaving your tools submerged in water, as this swells the wood and loosens the metal fittings. Once clean, dry the tools immediately with a clean towel. Store them in a well-ventilated area rather than a sealed plastic box, allowing any residual moisture to evaporate completely.
Community discussion
Share your experience or ask a question. Comments are reviewed before publication.