
Starting pottery at home is an incredibly rewarding way to explore your creativity, but walking into an art supply store can quickly feel overwhelming. The sheer variety of wire cutters, ribs, loops, and modeling tools can make it seem like you need a massive, expensive inventory just to shape a simple bowl. In reality, hand-building beautiful, functional ceramic pieces at home requires only a small, carefully selected set of fundamental tools. By focusing on high-quality, versatile basics, you can master the core techniques of pinching, coiling, and slab-building without cluttering your living space or overstretching your budget. Assembling your first kit is about understanding how each tool interacts with your chosen clay medium, allowing you to make smart, practical purchases that will support your creative journey from the very first pinch pot.
Essential Hand Tools for Your First Pottery Kit
When assembling your first pottery kit, your primary focus should be on the manual tools required for basic clay preparation, shaping, and smoothing. These tools act as extensions of your hands, helping you manage the clay’s moisture and structure. Before purchasing, it is important to verify how these tools fit your specific clay medium. For instance, traditional stoneware clays containing grog (fired clay particles) require highly durable tools that can withstand abrasion, while fine porcelain or air-dry clays demand ultra-smooth surfaces to prevent unwanted texturing.
A high-quality wire clay cutter is the very first tool you will need to slice portions of clay from a dense block. When evaluating a wire cutter, check for sturdy, ergonomic wooden or plastic toggle handles that fit comfortably in your hands. The wire itself should be a taut, rust-resistant stainless steel or braided metal. Inspect the connection points where the wire meets the handles; these should be tightly crimped or knotted to ensure the wire does not slip or snap under the tension of cutting through dense, cold clay.
Products mentioned in this guide
![[SG Stocks *Courier Delivery*] Artist 5pc Clay Tool Set / Clay Wax Pottery Tool / Moulding Create Smooth Texture / Cut and Carve Clay / Suitable for Use with Polymer / 5 Piece Set For Earthenware and Air Dry Clay / 1 ART PLACE](https://img.lazcdn.com/g/p/mdc/20481448ada59a0c6b61fda5378119e2.jpg_400x400q80.jpg_.webp)

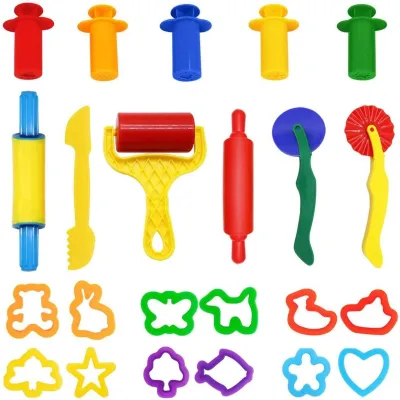
![🇸🇬 [New Product Sale] 56 Piece Set of Soft Clay Auxiliary Tools Cut Round Mould DIY Clay Tools](https://img.lazcdn.com/g/p/06c1ff11cb7a319c15e10d5f3ea50519.jpg_400x400q80.jpg_.webp)
Prices are valid at publication and may change. Please refer to the product page for the latest price.
Wooden ribs and sponges are your primary instruments for shaping, compressing, and controlling moisture. Wooden ribs are used to smooth out coil lines and compress the walls of your vessels to prevent cracking during drying. Look for ribs made from dense, fine-grained hardwoods like cherry or maple, which naturally resist warping when exposed to water. Run your fingers along the edges to verify they are completely smooth and splinter-free; any rough spots will leave deep gouges in your wet clay. For moisture control, natural silk sponges are highly recommended over synthetic kitchen sponges. Natural sponges are highly absorbent and release water evenly, allowing you to smooth surfaces without oversaturating and weakening the clay structure.
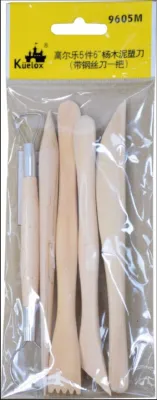
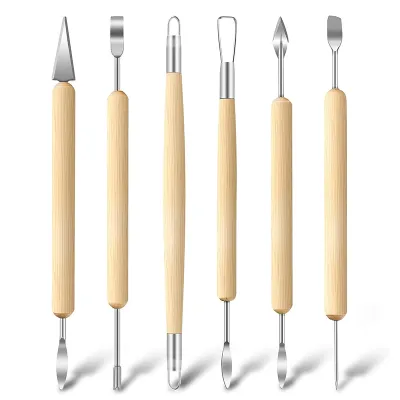
Needle tools and wooden modeling tools round out your essential hand tools. A needle tool is indispensable for trimming uneven rims, measuring slab thickness, and scoring joints before joining pieces of clay. Verify that the metal needle tip is securely fastened into its handle—whether made of wood, plastic, or aluminum—with absolutely no wobble. A loose needle is difficult to control and can easily bend or break. Wooden modeling tools, which often feature dual-ended curved and angled tips, are used for blending seams and drawing details. Ensure these tools have comfortable, ergonomic grips and are free of rough manufacturing seams that could catch on the clay.
Shaping and Detailing Tools for Home Projects
Once you have mastered the basic hand-building forms, you will need secondary tools to refine your shapes, add textures, and hollow out solid pieces. These tools allow you to transition from rough forms to detailed, finished projects. Because these tools directly carve and cut the clay, their material quality and flexibility are critical to achieving clean results without tearing the medium.

Loop and ribbon tools are designed for carving, trimming, and removing excess clay from your projects. Loop tools feature round wire ends, while ribbon tools utilize flat, sharpened metal bands. When selecting these, evaluate the stiffness of the metal loops. They must be rigid enough to cut through leather-hard clay without bending, yet sharp enough to shave off clean ribbons of material. The handles should feel balanced and comfortable in your hand, with the metal loops securely glued and crimped into the metal ferrules to prevent them from pulling out under pressure.
Fettling knives and wire-end modeling tools are essential for precise cutting and joining of clay slabs. A fettling knife features a long, thin blade designed for cutting straight lines and trimming excess clay. Look for a blade that is flexible yet firm enough to cut through thick slabs without bending off-course, which can cause uneven joints. Check the blade’s temper by gently bending it; it should spring back to its original straight shape immediately. Wire-end modeling tools combine a wooden handle with small wire loops at the ends, making them perfect for delicate carving and refining tight corners where larger loop tools cannot reach.
Texture mats and stamps offer an easy way to add surface patterns to your home pottery projects. When choosing these, look for reusable, easy-to-clean materials like silicone, deep-etched rubber, or sealed hardwood. The key performance factor to verify is how cleanly the tool releases from wet clay. You can perform an observable trial by pressing the stamp into a scrap piece of clay; it should release cleanly without sticking or pulling up the clay surface. Avoid stamps with overly deep, undercut designs, as these tend to trap wet clay and distort your patterns upon removal.
Setting Up a Safe and Practical Home Workspace
Working with clay at home is highly accessible, but it requires a thoughtful setup to protect your living space and maintain a healthy environment. Unlike a professional studio, a home workspace must be adapted to handle moisture, prevent plumbing issues, and manage clay dust safely. Setting up the right non-tool accessories before you begin will save you from costly home repairs and tedious cleanup sessions.
Your choice of work surface is the first line of defense for your home furniture. Raw canvas mats, plaster bats, or unsealed wooden boards are excellent choices for hand-building. These porous materials absorb excess moisture from the clay, allowing you to roll out slabs or build coils without the clay sticking to the table. Avoid working directly on polished dining tables, glass, or plastic laminates, as wet clay will adhere stubbornly to these surfaces, making cleanup difficult and potentially causing water damage or scratches.
Plumbing protection is perhaps the most critical aspect of running a home pottery workspace. You must never wash clay down your household drains. As clay suspended in water settles, it forms a dense, rock-hard plug in your pipes that can lead to severe plumbing blockages. To prevent this, set up a dedicated clay trap or a simple three-bucket settling system. Wash all your tools, hands, and sponges in a primary bucket of water first, allowing the heavy clay particles to settle to the bottom overnight. You can then pour the clear water off the top and scrape the settled clay sludge into a waste bin or a clay reclaim bucket.
Dust management is another vital safety consideration for home potters. When clay dries, it turns back into a fine powder containing crystalline silica, which can become airborne and pose respiratory risks over time. To keep your home safe, never sweep dry clay or use a standard household vacuum, as these methods will simply blow the fine silica dust back into the air. Instead, practice wet-cleaning methods. Wipe down your work surfaces, tools, and floors with a damp sponge or mop immediately after every session while the clay residue is still wet, and wash your work aprons and towels regularly.
What to Skip When Buying Your First Clay Tools
When you are excited to start a new hobby, it is easy to overspend on advanced equipment that you do not yet need. Many beginners fall into the trap of buying professional-grade gear, only to find that it complicates the learning process. Keeping your initial kit simple allows you to focus on mastering hand-building fundamentals before investing in specialized machinery.
Pottery wheels and kilns are major financial and spatial investments that you should defer until you have established a long-term commitment to the craft. Motorized wheels require significant practice to master and can be frustrating for absolute beginners, while home kilns require specialized electrical wiring, dedicated ventilation, and strict safety precautions. Many beautiful, functional ceramic pieces can be created entirely through hand-building techniques, and you can often find local community studios or firing services in Singapore to fire your finished pieces.
Avoid purchasing overly large, multi-piece professional tool sets. These massive kits often contain dozens of highly specialized tools—such as advanced turning tools, complex calipers, or niche carving instruments—that a beginner will rarely use. They clutter your workspace and make it harder to find the tools you actually need. A simple, high-quality starter kit containing the eight essential tools is far more valuable and easier to master than a massive box of low-grade, redundant tools.
Finally, skip tools made from fragile or decorative materials, such as brittle, unsealed plastics or cheap, soft woods that lack protective coatings. Under the constant moisture and physical pressure of clay work, unsealed wooden tools will quickly absorb water, swell, warp, and split. Brittle plastic tools can snap easily when carving dense clay, creating sharp edges that pose a safety hazard. Invest instead in tools made from durable, long-lasting materials like stainless steel, brass, silicone, and sealed hardwoods.
Where to Source Clay Tools in Singapore
Finding reliable clay tools in Singapore is straightforward if you know where to look. Because tool quality directly impacts your crafting experience, sourcing your gear from reputable suppliers ensures that your tools will last through many pottery sessions. You can combine physical shopping with online research to build the perfect starter kit.
Visiting local art and craft stores in Singapore is highly recommended for your first purchase. This allows you to physically inspect the tools before buying. You can feel the weight of a wooden rib, test the grip of a needle tool, and check the tension of a wire cutter in person. Look for established art supply stores in central areas or cultural districts that carry dedicated ceramic and pottery sections, where staff can often assist you in selecting the right materials.
If you prefer the convenience of online shopping, e-commerce platforms and specialized craft webstores offer a wide selection of beginner kits. When browsing online marketplaces, avoid buying the cheapest unbranded sets, which often suffer from poor construction. Instead, compare seller ratings, read user reviews specifically looking for feedback on durability and material quality, and carefully verify the product descriptions to ensure the tools are made from rust-resistant metals and sealed woods.
Another excellent avenue is reaching out to local pottery studios, community centers, or art schools in Singapore. Many of these institutions partner with local educational suppliers or distributors to source high-quality, durable tools for their students. They can often recommend reliable local distributors or even sell beginner-friendly tool kits directly to the public, ensuring you get studio-grade tools that are built to last.
Frequently Asked Questions (FAQ)
How do I clean and store my clay tools to prevent rust and mold?
To keep your clay tools in top condition, establish a thorough cleaning routine at the end of every pottery session. Wipe down all metal tools, such as wire cutters, needle tools, and ribbon loops, with a damp sponge to remove all clay residue, then dry them immediately with a clean towel to prevent oxidation and rust. For wooden tools, wash them gently under running water without soaking them, as prolonged exposure to water can cause the wood to swell and warp. Allow them to air-dry completely in a well-ventilated area. Store your clean, dry tools in a breathable canvas tool roll or an open container; avoid sealed plastic bags or airtight boxes, which trap residual moisture and encourage mold growth.
Can I use regular kitchen utensils instead of specialized clay tools?
Yes, many household items make excellent temporary substitutes for basic clay work. A standard rolling pin can roll out slabs, a butter knife can cut straight lines, and an old plastic card can act as a flexible rib for smoothing surfaces. However, you must never return these items to the kitchen for food preparation. Clay bodies and glazes contain minerals and metal oxides that can leave toxic residues, posing a serious cross-contamination risk. Additionally, while kitchen utensils are helpful for starting out, they have limitations. A butter knife lacks the precise flexibility of a fettling knife, and a standard kitchen sponge is often too porous, holding too much water and oversaturating your clay, which can lead to cracking as the piece dries.
Community discussion
Share your experience or ask a question. Comments are reviewed before publication.