
Choosing the right Angelus leather paint starter kit depends primarily on the specific item you plan to customise, the material’s surface area, and your current skill level. While Angelus acrylic leather paint is highly regarded for its flexibility and durability, selecting the wrong configuration can lead to insufficient paint volumes, missing preparation solvents, or unnecessary tools that inflate your initial costs. By matching your kit selection to your project—whether it is a pair of leather sneakers, a structured handbag, or a vintage leather jacket—you ensure a smooth application process and a professional-grade finish that resists cracking and peeling.
For first-time customisers, navigating the wide array of individual paints, preparers, finishers, and brushes can be overwhelming. Standard acrylic paints from general craft stores lack the elasticity required for pliable surfaces, leading to rapid cracking when the material bends. Angelus paints are formulated with a flexible polyurethane-acrylic hybrid binder that moves naturally with leather, making them the industry standard for custom footwear and accessories. A pre-bundled starter kit simplifies your entry into the craft, offering a cost-effective, curated selection of essentials that saves you from purchasing full-sized individual bottles before you have mastered the basic techniques.
Understanding the Value of an Angelus Starter Kit
Investing in a bundled starter kit is highly practical for beginners due to both financial savings and process convenience. Purchasing individual 1 oz (approx. 29.5 ml) bottles of paint, a dedicated leather preparer, a topcoat finisher, and a set of quality synthetic brushes separately can quickly accumulate costs. In Singapore, individual component pricing often means a complete DIY setup assembled piece-by-piece can cost significantly more than a pre-packaged kit, which typically ranges from S$30 to S$100 depending on the contents. A starter kit lowers this financial barrier, providing exactly what is needed to complete a first project without leaving you with excess specialty products you may not use again.
Products mentioned in this guide
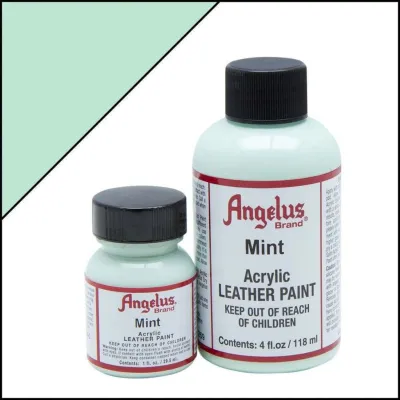
Prices are valid at publication and may change. Please refer to the product page for the latest price.
Beyond cost, a starter kit eliminates the guesswork of product compatibility. Angelus paints are designed to work as a system, requiring specific surface preparation to adhere correctly and a dedicated topcoat to seal the design. Starter kits are pre-configured to include these vital preparation and finishing agents in balanced ratios. This ensures that your paint bonds directly to the leather fibers rather than sitting loosely on top of factory-applied glazes or oils.
However, the ultimate value of any kit depends on whether its contents match the scale of your project. While a basic kit is ideal for painting small accents on footwear, it will fall short if you attempt to recolour a large leather tote bag or a full-length jacket. Understanding the physical demands of your target item is the first step in selecting the correct kit configuration.
Matching the Kit to Your Project Type and Skill Level
Different leather goods undergo varying degrees of physical stress, flexing, and environmental exposure. Consequently, the tools and paint volumes required to customise a sneaker differ substantially from those needed for a structured bag or a heavy leather jacket.

Sneakers vs. Bags vs. Jackets
Sneakers require a paint system capable of enduring extreme, repetitive flexing, particularly along the vamp and toe box. When customising footwear, thorough surface preparation is critical because factory-applied protective coatings will cause paint to slide or peel if not completely stripped. A sneaker-focused kit must include an adequate volume of leather preparer and deglazer, along with multiple fine detail brushes to navigate complex paneling, eyelets, and midsole borders. If you plan to paint midsoles or rubber elements, you must also verify if your kit includes or can be paired with adhesion promoters, as paint will not stick to non-porous rubber or plastic surfaces on its own.
Bags present larger, flatter surfaces that demand consistent, streak-free paint application. Unlike sneakers, which feature small, distinct panels, a handbag or backpack requires smooth blending across wide areas. This means you will need larger flat brushes and a greater volume of paint. You must also evaluate the texture of the leather: smooth leathers are highly receptive to standard application, whereas pebbled or heavily textured leathers require the paint to be worked carefully into the crevices, which naturally consumes more paint and requires softer, more flexible bristles.
Jackets represent the most demanding customisation projects due to their massive surface area and the high-wear zones around the elbows, cuffs, and collar. Standard starter kits containing small 1 oz jars are entirely insufficient for full-garment projects. Painting a jacket requires larger paint volumes—often 4 oz bottles for primary base colours—and a wider variety of large flat brushes to avoid visible brush strokes. Additionally, because jackets drape and fold across the body, the paint must be applied in incredibly thin layers to preserve the natural softness of the leather.
Beginner vs. Intermediate Tool Needs
If you are a complete beginner, your priority should be mastering basic paint flow, brush control, and layer thickness. For your first project, look for kits that focus on core essentials:
- Synthetic brushes in basic shapes (such as a detail round brush and a medium flat brush).
- A basic mixing palette for blending custom shades.
- A standard acrylic finisher to protect the final design.
Intermediate customisers may want to look for kits that include specialized tools, such as precision masking tapes for clean geometric lines, airbrush thinners (like Angelus 2-Thin) for flawless gradient sprays, or specialized finishers (such as Matte or Satin-Gloss specific formulas). Beginners should generally avoid high-cost kits bundled with advanced airbrush adapters or complex additives, as these tools require a steep learning curve and can distract from mastering fundamental hand-painting techniques.
Comparing Common Angelus Starter Kit Configurations
Art supply retailers and e-commerce platforms often package Angelus products into several distinct kit configurations. Understanding these common groupings helps you identify which bundle fits your project scope without overpaying for unnecessary extras.
Basic/Standard Starter Kit
This configuration is designed for small touch-ups, single-colour accents, or crafters who want to test the medium before committing to a larger project. It typically includes three to five primary paint colours in standard 1 oz bottles, a small bottle of leather preparer, and a couple of basic utility brushes. It is highly economical but lacks specialized finishers or precision detailing tools.
Sneaker Customisation Kit
Tailored specifically for footwear enthusiasts, this kit focuses heavily on preparation and durability. It generally includes a robust bottle of Leather Preparer & Deglazer, a selection of popular sneaker colours, a bottle of acrylic finisher (often Matte or Satin to mimic factory finishes), and a set of fine detail brushes. This is the most balanced option for shoe customisation.
Comprehensive/Deluxe Kit
Designed for artists planning large-scale projects or multiple sequential customisations, this kit offers a wide colour spectrum, larger bottles of preparers and finishers, and a diverse range of brush shapes and sizes. While it carries a higher upfront cost, it provides the lowest cost-per-ounce of paint and ensures you have the necessary tools for complex, multi-material designs.
| Configuration Type | Ideal Project | Key Inclusions to Look For | Limitations |
|---|---|---|---|
| Basic / Standard Kit | Small touch-ups, single-colour accents, or testing the medium | 3 to 5 primary paint colours (1 oz), basic synthetic brushes, small preparer | Limited colour range, lacks specialized finishers or precision tape |
| Sneaker Customisation Kit | Footwear customisation (leather uppers, midsoles, panel detailing) | Preparer & Deglazer, acrylic finisher (Matte/Satin), fine detail brushes | Paint volume may be insufficient for larger bags or garments |
| Comprehensive / Deluxe Kit | Large-scale projects (jackets, large bags) or multiple sequential projects | Wide colour spectrum, larger preparer/finisher bottles, varied brush sizes | Higher upfront cost; includes advanced tools beginners might not use immediately |
Essential Components to Verify Before Buying
Because third-party retailers frequently assemble their own custom bundles, you must carefully inspect the product description of any kit before purchasing. Ensure the following components are present and meet your project requirements:
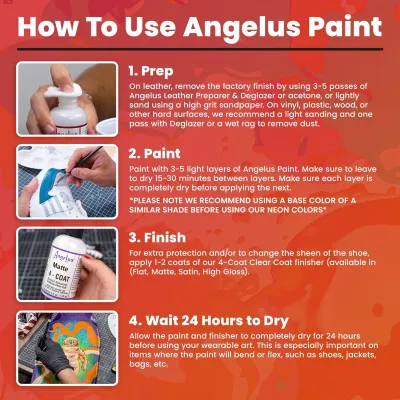
- Leather Preparer & Deglazer: This solvent is non-negotiable for any customisation project on factory-finished leather. It strips away the original protective topcoat, exposing the raw leather pores so the acrylic paint can form a permanent bond. If a kit lacks this preparer, you must purchase it separately; attempting to paint directly over a factory finish will result in the paint peeling off in sheets once dry.
- Acrylic Finisher: Once your paint job is complete, an acrylic finisher must be applied to seal the paint, provide water resistance, and protect the design from scuffs and scratches. Finishes come in various sheens, including Matte, Satin, No-Threshold, and High Gloss. Verify which finisher is included in the kit to ensure it matches your aesthetic goals.
- Paint Volume: Check whether the kit contains standard 1 oz (approx. 29.5 ml) jars or smaller sample pots (such as 0.5 oz). While sample pots are fine for minor detailing or colour testing, they do not hold enough paint to cover larger panels or complete a full sneaker pair with the necessary multiple coats.
- Brush Quality: Acrylic leather paint requires synthetic fiber brushes. Natural hair brushes (such as camel hair or sable) absorb too much water, lose their structural spring when loaded with heavy acrylic pigments, and degrade rapidly when exposed to harsh cleaning solvents or preparers. Ensure the kit specifies synthetic bristles that maintain their shape for crisp lines.
Safe Preparation and First-Use Guidelines for Beginners
Working with leather customisation products involves chemical solvents and specialized paint application techniques. Prioritizing safety and proper methodology ensures both your personal well-being and a durable finish on your item.
Before beginning any customisation project, always check the applied product’s label and the treated item’s manufacturer instructions. If instructions conflict, the item is unidentified, or the intended use is not covered, stop and consult the manufacturer or a qualified professional.
Workspace Setup
Leather deglazers and acrylic finishers contain volatile organic solvents that release strong fumes. Always set up your workstation in a well-ventilated area. If you are working indoors in Singapore, open windows and use a fan to maintain continuous airflow away from your face. Keep these chemical bottles tightly capped when not in use, and work on a protected surface (such as a cutting mat or heavy craft paper) to prevent accidental spills from damaging your furniture.
Surface Testing
To prevent irreversible damage to your item, perform a small, inconspicuous test before applying products to the entire surface. Apply a tiny amount of the preparer and paint to a hidden area—such as the inside of a shoe tongue, an inner seam, or an interior pocket. Observe the area for any adverse reactions, colour bleeding, or material degradation, particularly when working with delicate, vintage, or unidentified leathers.
Application Basics
Achieving a durable, professional finish requires patience. Never attempt to cover the leather in a single, thick coat of paint, as this leads to heavy brush strokes, uneven drying, and eventual cracking. Instead, apply multiple thin, even layers. Allow each layer to dry completely before applying the next. The paint should feel dry to the touch and lose its tacky texture before you proceed with subsequent coats.
Heat Safety
While you can use a heat source to accelerate drying times between coats, you must exercise extreme caution. Never use a heat gun on a high setting or hold it too close to the leather. Excessive heat can dry out and warp natural leather fibers, melt the structural adhesives holding shoe soles together, or cause the wet paint layer to bubble and blister. If you choose to use a heat source, use a standard hair dryer on a low, warm setting, keeping it at least 30 cm away from the surface and in constant motion.
Frequently Asked Questions (FAQ)
Can I use Angelus leather paint on synthetic materials or canvas?
Yes, Angelus leather paint can be applied to synthetic materials, vinyl, and textiles, but you must use specific additives to ensure proper adhesion and flexibility. For hard plastics, midsoles, or synthetic vinyl, mix the paint with an adhesion promoter such as Angelus 2-Hard, which helps the paint bond to non-porous surfaces. For flexible fabrics like canvas, mesh, or denim, mix the paint with a fabric medium like Angelus 2-Soft in a 1:1 ratio, and heat-set the painted area according to the manufacturer’s instructions to prevent the fabric from becoming stiff or rough. Always verify specific material compatibility and mixing ratios on the product labels before application.
How long does a customised item take to fully cure?
There is a significant difference between paint being dry to the touch and being fully cured. While individual thin coats of Angelus paint typically dry to the touch within 15 to 30 minutes, the paint system requires a full 24 to 48 hours to cure completely. During the curing process, the acrylic polymers cross-link to form a highly durable, water-resistant barrier. In Singapore’s highly humid tropical climate, drying and curing times are naturally extended because moisture evaporates more slowly from the paint film. To ensure maximum durability, allow your completed project to cure in a dry, well-ventilated indoor space for at least 48 hours before wearing, handling, or exposing the item to moisture. Always verify the specific cure times on the product labels.
Community discussion
Share your experience or ask a question. Comments are reviewed before publication.