
Selecting the correct bubble polymailer size is a foundational decision for any online business operating in Singapore’s competitive e-commerce landscape. When shipping products to customers across the island, the packaging you choose acts as both a protective shield and a direct driver of your operational margins. Finding the right dimensions ensures your items arrive safely without incurring unnecessary shipping fees or wasting valuable packaging materials.
Why Correct Sizing Matters for Bubble Polymailers
For e-commerce merchants, packaging efficiency directly influences the bottom line. Oversized bubble polymailers introduce several hidden costs, most notably through dimensional weight (DIM weight) calculations. Major local logistics providers and courier services in Singapore calculate shipping fees based on either physical weight or volumetric dimensions, whichever is greater. When you use a mailer that is excessively large for the item inside, you are effectively paying to ship trapped air. Over hundreds of shipments, these minor shipping fee discrepancies accumulate into significant financial losses that erode profit margins. Furthermore, excess space allows the product to slide around during transit, increasing the risk of surface scratches, cosmetic damage, or internal component failure.
Conversely, attempting to squeeze products into an undersized mailer presents immediate physical risks. When a polymailer is packed beyond its intended capacity, the lateral tension forces the side seams to stretch to their limit. During transit, physical impacts from automated sorting machines or manual handling can easily cause these stressed seams to burst open, exposing or losing the contents. Additionally, overstuffing prevents the self-sealing adhesive flap from folding over completely flat. In Singapore’s high-humidity tropical climate, a compromised adhesive seal is highly susceptible to peeling open when exposed to moisture or temperature fluctuations during last-mile delivery. Ensuring a proper fit preserves product integrity, minimizes return rates, and optimizes your shipping budget.
Products mentioned in this guide
![[SG SELLER] Matte Bubble Mailer Poly Mailer Self-Seal Adhesive Padded Envelope Water Resistant Shipping Bags for Mailing](https://img.lazcdn.com/g/p/a61faf78eab8d6675425500915db76e8.png_400x400q80.png_.webp)
![[ALFAPKG] 10pcs Air Bubble Padded Envelope / Kraft Mailer Bag](https://img.lazcdn.com/g/p/695f88f9c256405b4de7a2e6ff315d86.png_400x400q80.png_.webp)
Prices are valid at publication and may change. Please refer to the product page for the latest price.
How to Measure Your Products Accurately
Before you can choose the ideal bubble polymailer, you must establish the precise physical dimensions of your inventory. This process requires measuring the length, width, and height (or thickness) of each item using a reliable ruler or measuring tape. It is a common mistake to rely solely on the manufacturer’s flat dimensions, as these rarely account for the three-dimensional volume the product occupies once packaged.

Depending on the physical properties of your goods, you will need to adopt different measurement strategies. Soft, pliable items behave very differently under compression than rigid, boxed products. Understanding these material behaviors ensures that your initial measurements serve as an accurate baseline for your packaging calculations.
Measuring Flat and Flexible Items
When dealing with soft goods such as apparel, textiles, or soft accessories, the item’s flat, unfolded state can be highly misleading. A flat t-shirt occupies a large surface area but has almost zero thickness. However, you will fold the shirt into a compact bundle for shipping.
To measure flexible items accurately, fold the product into the exact configuration in which it will be packed. Once folded, press down gently on the item to simulate the natural compression it will experience inside a shipping bag, then measure its maximum length, width, and thickness. It is this folded volume, rather than the maximum unfolded surface area, that dictates the actual shipping space required. Keep in mind that compressed fabrics will naturally expand slightly inside the mailer, so your measurements should reflect the item’s relaxed, folded state to prevent excessive pressure on the mailer’s seams.
Measuring Rigid and Boxed Items
For rigid items, such as books, cosmetics, or boxed electronics, there is no room for physical compression. These items possess fixed, unyielding dimensions that must be accommodated entirely by the polymailer’s internal volume.
When measuring rigid goods, you must identify and measure the absolute maximum external dimensions. This includes any protruding parts, structural corners, hanging tabs, or protective retail packaging that extends beyond the main body of the product. Never assume any flexibility or give in these items. If a retail box has a plastic hanging hook or a decorative sleeve, these must be included in your length and width measurements. Failing to account for these small protrusions can result in a mailer that punctures easily during transit or resists sealing entirely, as the sharp corners of rigid boxes place intense point-pressure on the polymailer’s seams.
The Sizing Formula: Calculating the Ideal Mailer Dimensions
Once you have gathered the precise length, width, and thickness of your product, you can use a straightforward mathematical formula to determine the minimum required dimensions of your bubble polymailer. Because bubble mailers feature an integrated layer of air-filled bubble wrap, their internal usable space is always smaller than the external dimensions advertised by packaging manufacturers. To ensure a safe, comfortable fit, you must apply specific allowances to your product’s measurements.
The Width Allowance (Gusset Calculation) When a flat polymailer is filled with a three-dimensional object, the sides of the mailer must pull inward to accommodate the item’s thickness. This physical deformation reduces the effective width of the mailer. To compensate for this, you must add the item’s thickness to its width. Additionally, you must account for the space occupied by the internal bubble lining itself, which typically reduces the usable width by about 1 to 1.5 centimeters on each side.
- Width Formula: Minimum Mailer Width = Product Width + Product Thickness + Seam & Bubble Allowance (approx. 1.5 to 2 cm)
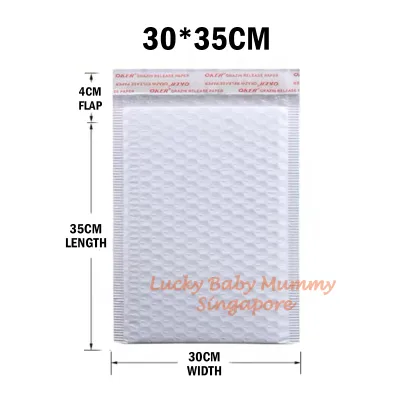
The Length Allowance (Flap and Fold Calculation) Similar to the width, the length of the mailer is consumed by the product’s thickness as the bag wraps around the item. Furthermore, you must ensure there is sufficient length left over for the self-sealing flap to fold over completely and adhere securely to the back of the mailer. The sealing flap itself typically requires an allowance of 4 to 5 centimeters (about 1.5 to 2 inches).
- Length Formula: Minimum Mailer Length = Product Length + Product Thickness + Flap & Seal Allowance (approx. 4 to 5 cm) + Bubble Allowance (approx. 1.5 cm)
The Combined Sizing Formula To simplify your procurement process, you can combine these factors into a single, reliable formula to find the minimum external mailer dimensions required:
- External Width = Product Width + Product Thickness + 2 cm
- External Length = Product Length + Product Thickness + 6 cm
Let us apply this formula to a practical scenario. Suppose you are shipping a standard hardcover book that measures 22 cm in length, 15 cm in width, and 3 cm in thickness.
- Required External Width = 15 cm (width) + 3 cm (thickness) + 2 cm = 20 cm
- Required External Length = 22 cm (length) + 3 cm (thickness) + 6 cm = 31 cm
In this case, you should look for a bubble polymailer with external dimensions of at least 20 cm x 31 cm. If your supplier’s nearest standard size is 20 cm x 32 cm or 22 cm x 34 cm, select the larger option to ensure the book slides in smoothly without binding.
Recommended Bubble Polymailer Sizes for Common Products
To help streamline your packing operations and reduce decision fatigue, it is highly beneficial to map your inventory to standard industry polymailer sizes. While standard sizes can vary slightly between manufacturers, most suppliers offer a consistent range of dimensions designed to accommodate common e-commerce items.
The following table provides a quick-reference guide matching typical product categories with their standard dimensions and the recommended bubble polymailer sizes. The dimensions are presented in both centimeters and inches to accommodate different supplier specifications.
| Product Category | Typical Product Dimensions | Recommended Mailer Size (External) |
|---|---|---|
| Small Jewelry & Cosmetics (e.g., lipstick, earrings, delicate necklaces) | 8 x 5 x 2 cm (3.1 x 2 x 0.8 in) | 11 x 15 cm (4.3 x 5.9 in) |
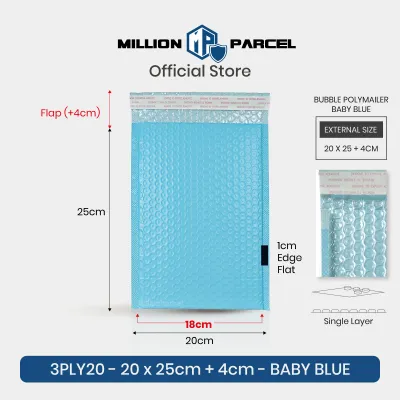
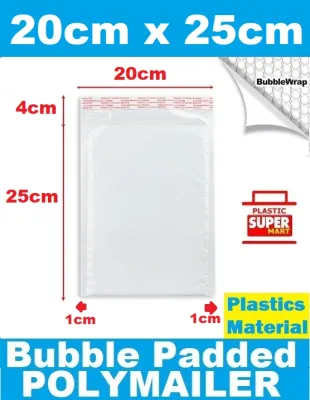
| Small Electronics & Accessories (e.g., smartphone, power bank, charging cables) | 16 x 8 x 2.5 cm (6.3 x 3.1 x 1 in) | 20 x 25 cm (7.8 x 9.8 in) |
| Standard Books & Novels (e.g., A5 size paperback, medium journal) | 21 x 15 x 3 cm (8.3 x 5.9 x 1.2 in) | 23 x 30 cm (9 x 11.8 in) |
| Single Apparel Item (e.g., folded T-shirt, lightweight summer dress) | 25 x 20 x 2 cm (9.8 x 7.9 x 0.8 in) | 29 x 37 cm (11.4 x 14.5 in) |
| Thicker Apparel / Multiple Items (e.g., folded hoodie, jeans, or 3-4 T-shirts) | 35 x 28 x 6 cm (13.8 x 11 x 2.4 in) | 43 x 50 cm (16.9 x 19.7 in) |
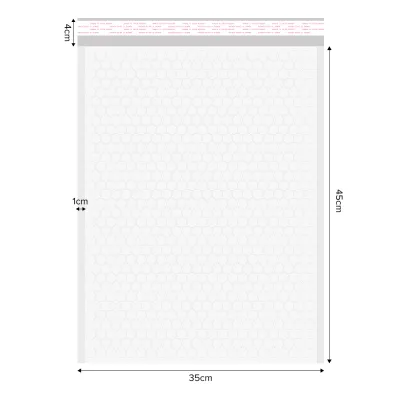
| Small Shoe Box / Toy Box (e.g., toddler shoes, boxed action figure) | 22 x 14 x 10 cm (8.7 x 5.5 x 3.9 in) | 35 x 45 cm (13.8 x 17.7 in) |
Disclaimer: The recommendations provided in this table serve as baseline guidelines for standard, rectangular items. Because product shapes, folding techniques, and protective packaging materials vary significantly, you must always calculate the required dimensions for your specific items and verify the fit before placing a bulk order.
Common Sizing Mistakes and How to Avoid Them
Even with a mathematical formula in hand, several common pitfalls can compromise your packaging strategy. Recognizing these mistakes early can save your business from costly shipping errors and damaged inventory.
Ignoring the Internal Bubble Thickness The most frequent error is treating a bubble polymailer as if it were a standard, single-wall plastic polymailer. The internal bubble lining, while excellent for cushioning, physically occupies space. If you choose a mailer based solely on its external dimensions without subtracting the bubble thickness, the resulting fit will be incredibly tight. This places immense stress on the seams and can cause the bubbles to pop during insertion, reducing the protective qualities of the packaging.
Disregarding the Sealing Flap Length Sellers occasionally forget that the self-sealing adhesive strip is located on a flap that must fold over the opening. If your product is too long, you may still be able to push it into the bag, but you will not have enough leftover material to fold the flap over securely. Attempting to force a seal by stretching the flap can result in the adhesive peeling back during transit, leaving your product exposed to dirt, moisture, and theft.
Assuming Plastic Will Stretch Around Rigid Corners While polyethylene is a flexible material, it is not highly elastic. Attempting to stretch a polymailer around a rigid, sharp-cornered item like a wooden box or a heavy board game will not work. Instead of stretching, the plastic will likely puncture at the corners, or the heat-sealed side seams will split. Always allow a generous safety margin for rigid items to ensure they slide in and out of the mailer with minimal resistance.
Actionable Pre-Order Checks To avoid these issues, never purchase bubble polymailers in bulk without conducting a physical trial first. Most reputable packaging suppliers in Singapore offer sample packs containing one or two mailers of each standard size. Use these samples to perform a hands-on fit test:
- The Slide Test: The product should slide into the mailer smoothly without requiring force or causing the seams to bulge outward.
- The Seal Test: Fold the adhesive flap over naturally. It should lie completely flat against the back of the mailer with no tension.
- The Environmental Check: In Singapore’s humid climate, test the adhesive strength by sealing a sample mailer and leaving it in a warm, non-air-conditioned space for 24 hours. The bond should remain fully intact and require destructive tearing to open.
Frequently Asked Questions (FAQ)
Can I use a bubble polymailer for heavy or highly fragile items?
While bubble polymailers provide excellent surface protection, scratch resistance, and light moisture defense, they are not designed to withstand heavy loads or high-impact crushing forces. The air bubbles inside the lining can pop under significant weight, and the flexible plastic exterior offers no structural rigidity. For highly fragile items—such as glassware, ceramics, or sensitive electronics—or heavy goods, you should use a rigid corrugated cardboard box. If you still want to use a polymailer for weather protection, place the item securely inside a rigid box first, and then insert the box into a larger polymailer, ensuring you have calculated the mailer size based on the box’s external dimensions.
How do I account for multiple items in a single polymailer?
When preparing bundled or multi-item shipments, do not simply add the individual dimensions of each item together. Instead, physically arrange the items exactly as they will be packed inside the mailer—whether stacked vertically, placed side-by-side, or nested together. Once you have created this physical bundle, treat it as a single, consolidated product. Use a measuring tape to find the maximum length, width, and thickness of the entire bundle, and then apply the standard sizing formula to these aggregated measurements. This ensures that the mailer accommodates the collective volume and shape of the bundle without placing uneven pressure on the seams.
Community discussion
Share your experience or ask a question. Comments are reviewed before publication.